Shopify Google Ads Enhanced Conversion Tracking (2023)
Updated Dec 21st 2026
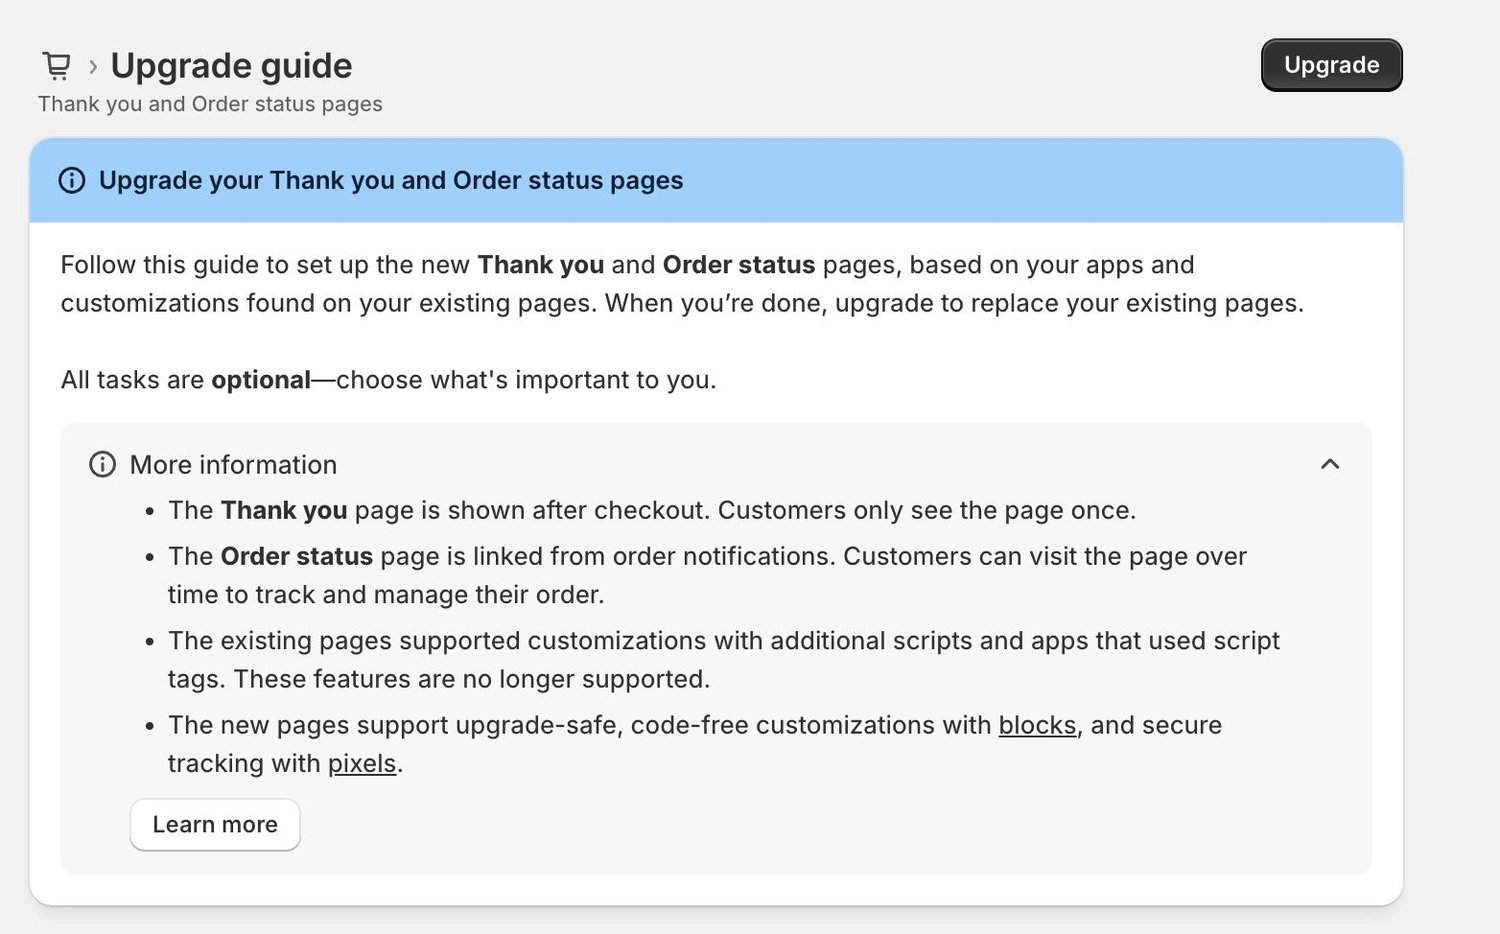
Shopify thank you pages are being updated. The older manual Google Ads tracking methods will stop working August 26, 2026. You can check the Upgrading and replacing your Thank you and Order status pages, and the related Reviewing and replacing additional scripts on your Thank you and Order status pages
New easier method
Here’s how things work moving forward. Steps below will apply, whether you had custom coded Google Ads conversions via gtag, Google Tag Manager, or if you’re starting from scratch. Let’s go.
You’ll install the Google & YouTube Shopify App. It’s going to handle your conversions.
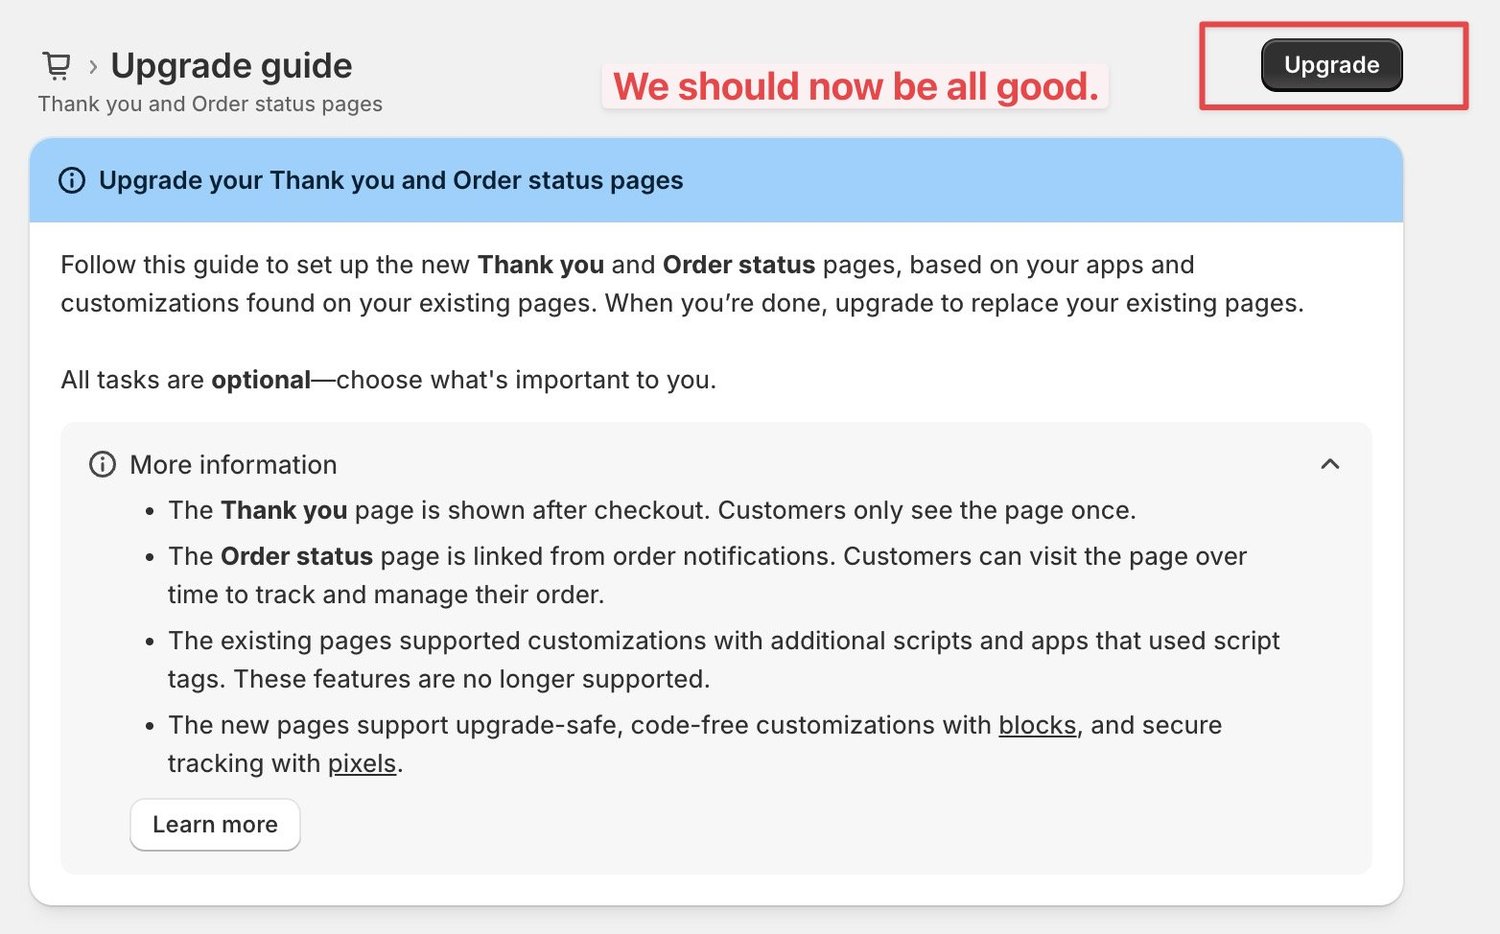
If you need to update your Thank you and Order status pages, you’ll see an option like this.
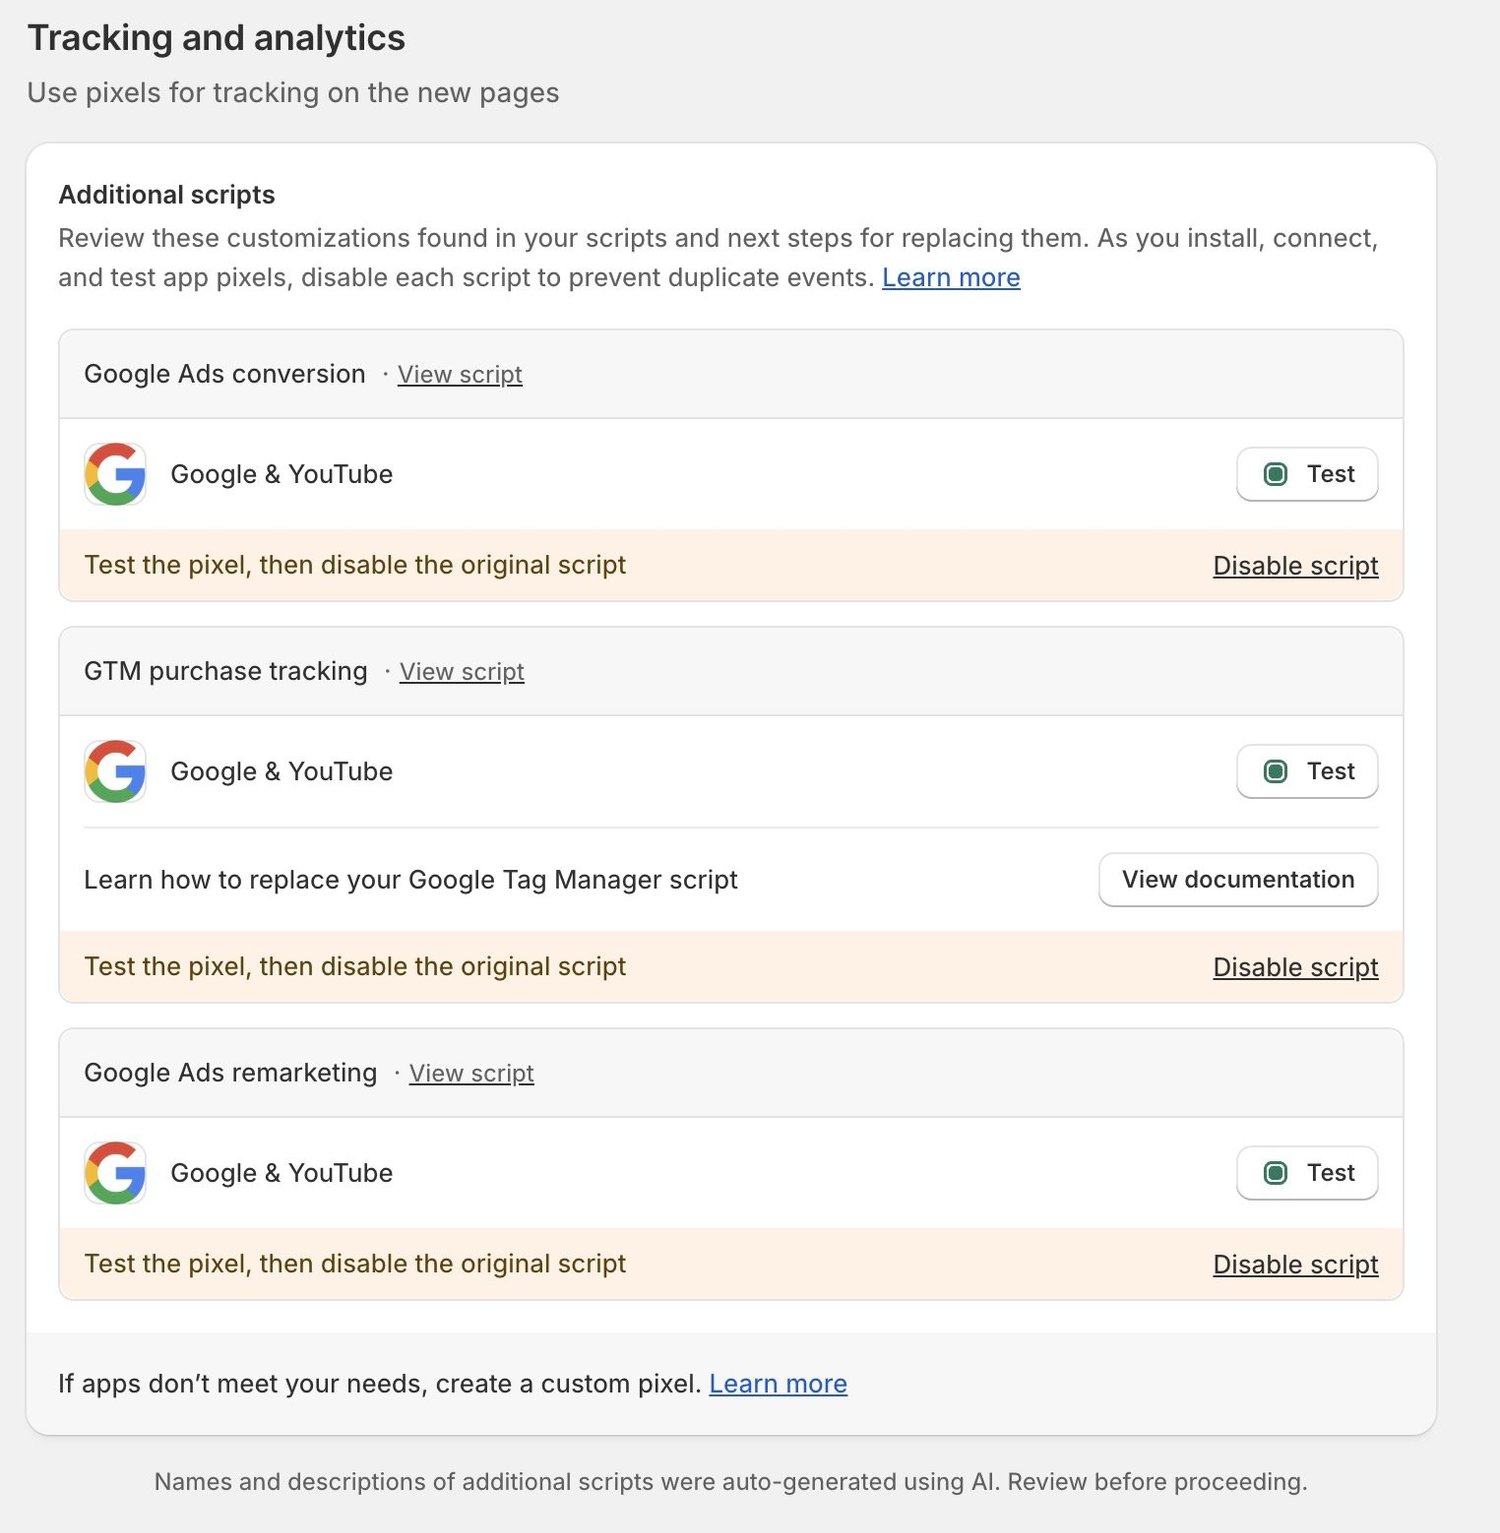
I recommend installing the new Google Ads conversions and testing first, before upgrading.
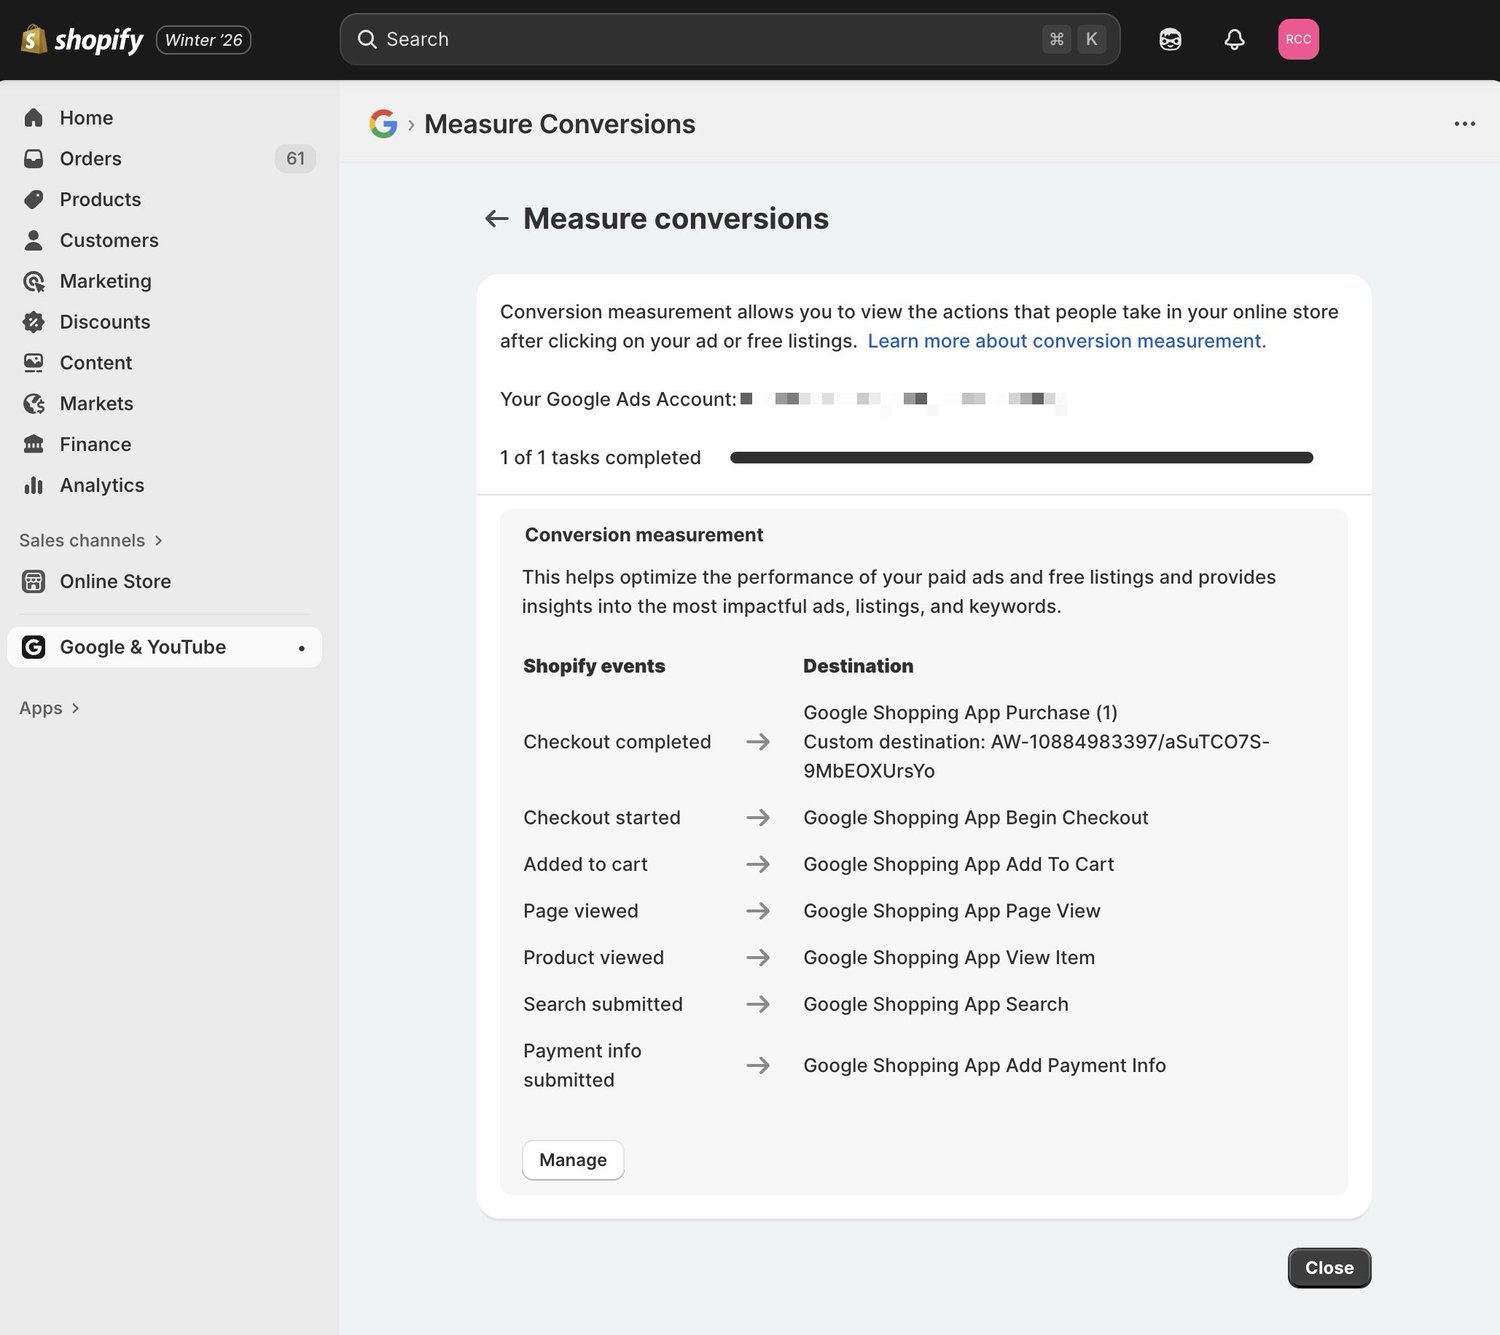
If you have old, manually custom coded Google Ads conversions, you will see a view like this. This is Shopify saying: “You’ve previously set up conversions like this. Here’s what we believe they do, and the app that you should use to replace your old conversion tags”
Heading over to Google and YouTube app within your Shopify dashboard, go to the Conversion Event Settings part and click Manage.
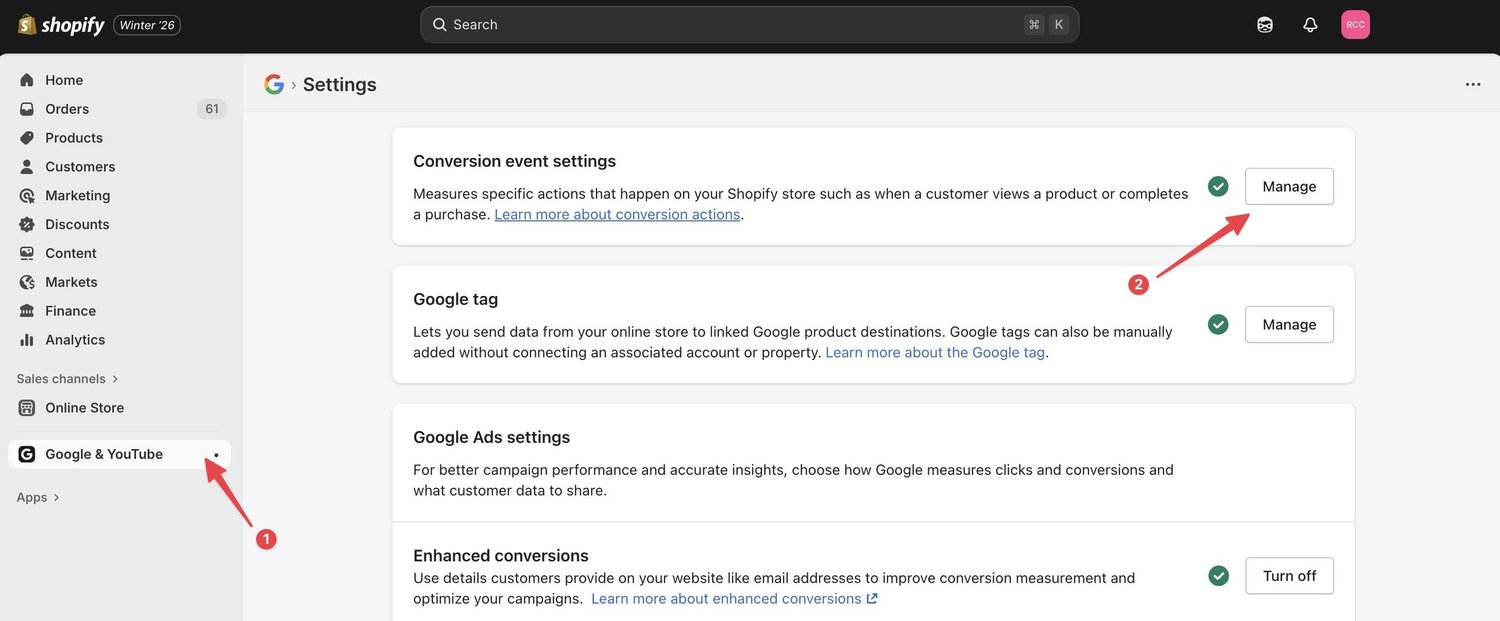
The Shopify Google App is kind enough to automatically create all the conversion events for you within your Google Ads dashboard and connect your Shopify, the app and conversions all together.
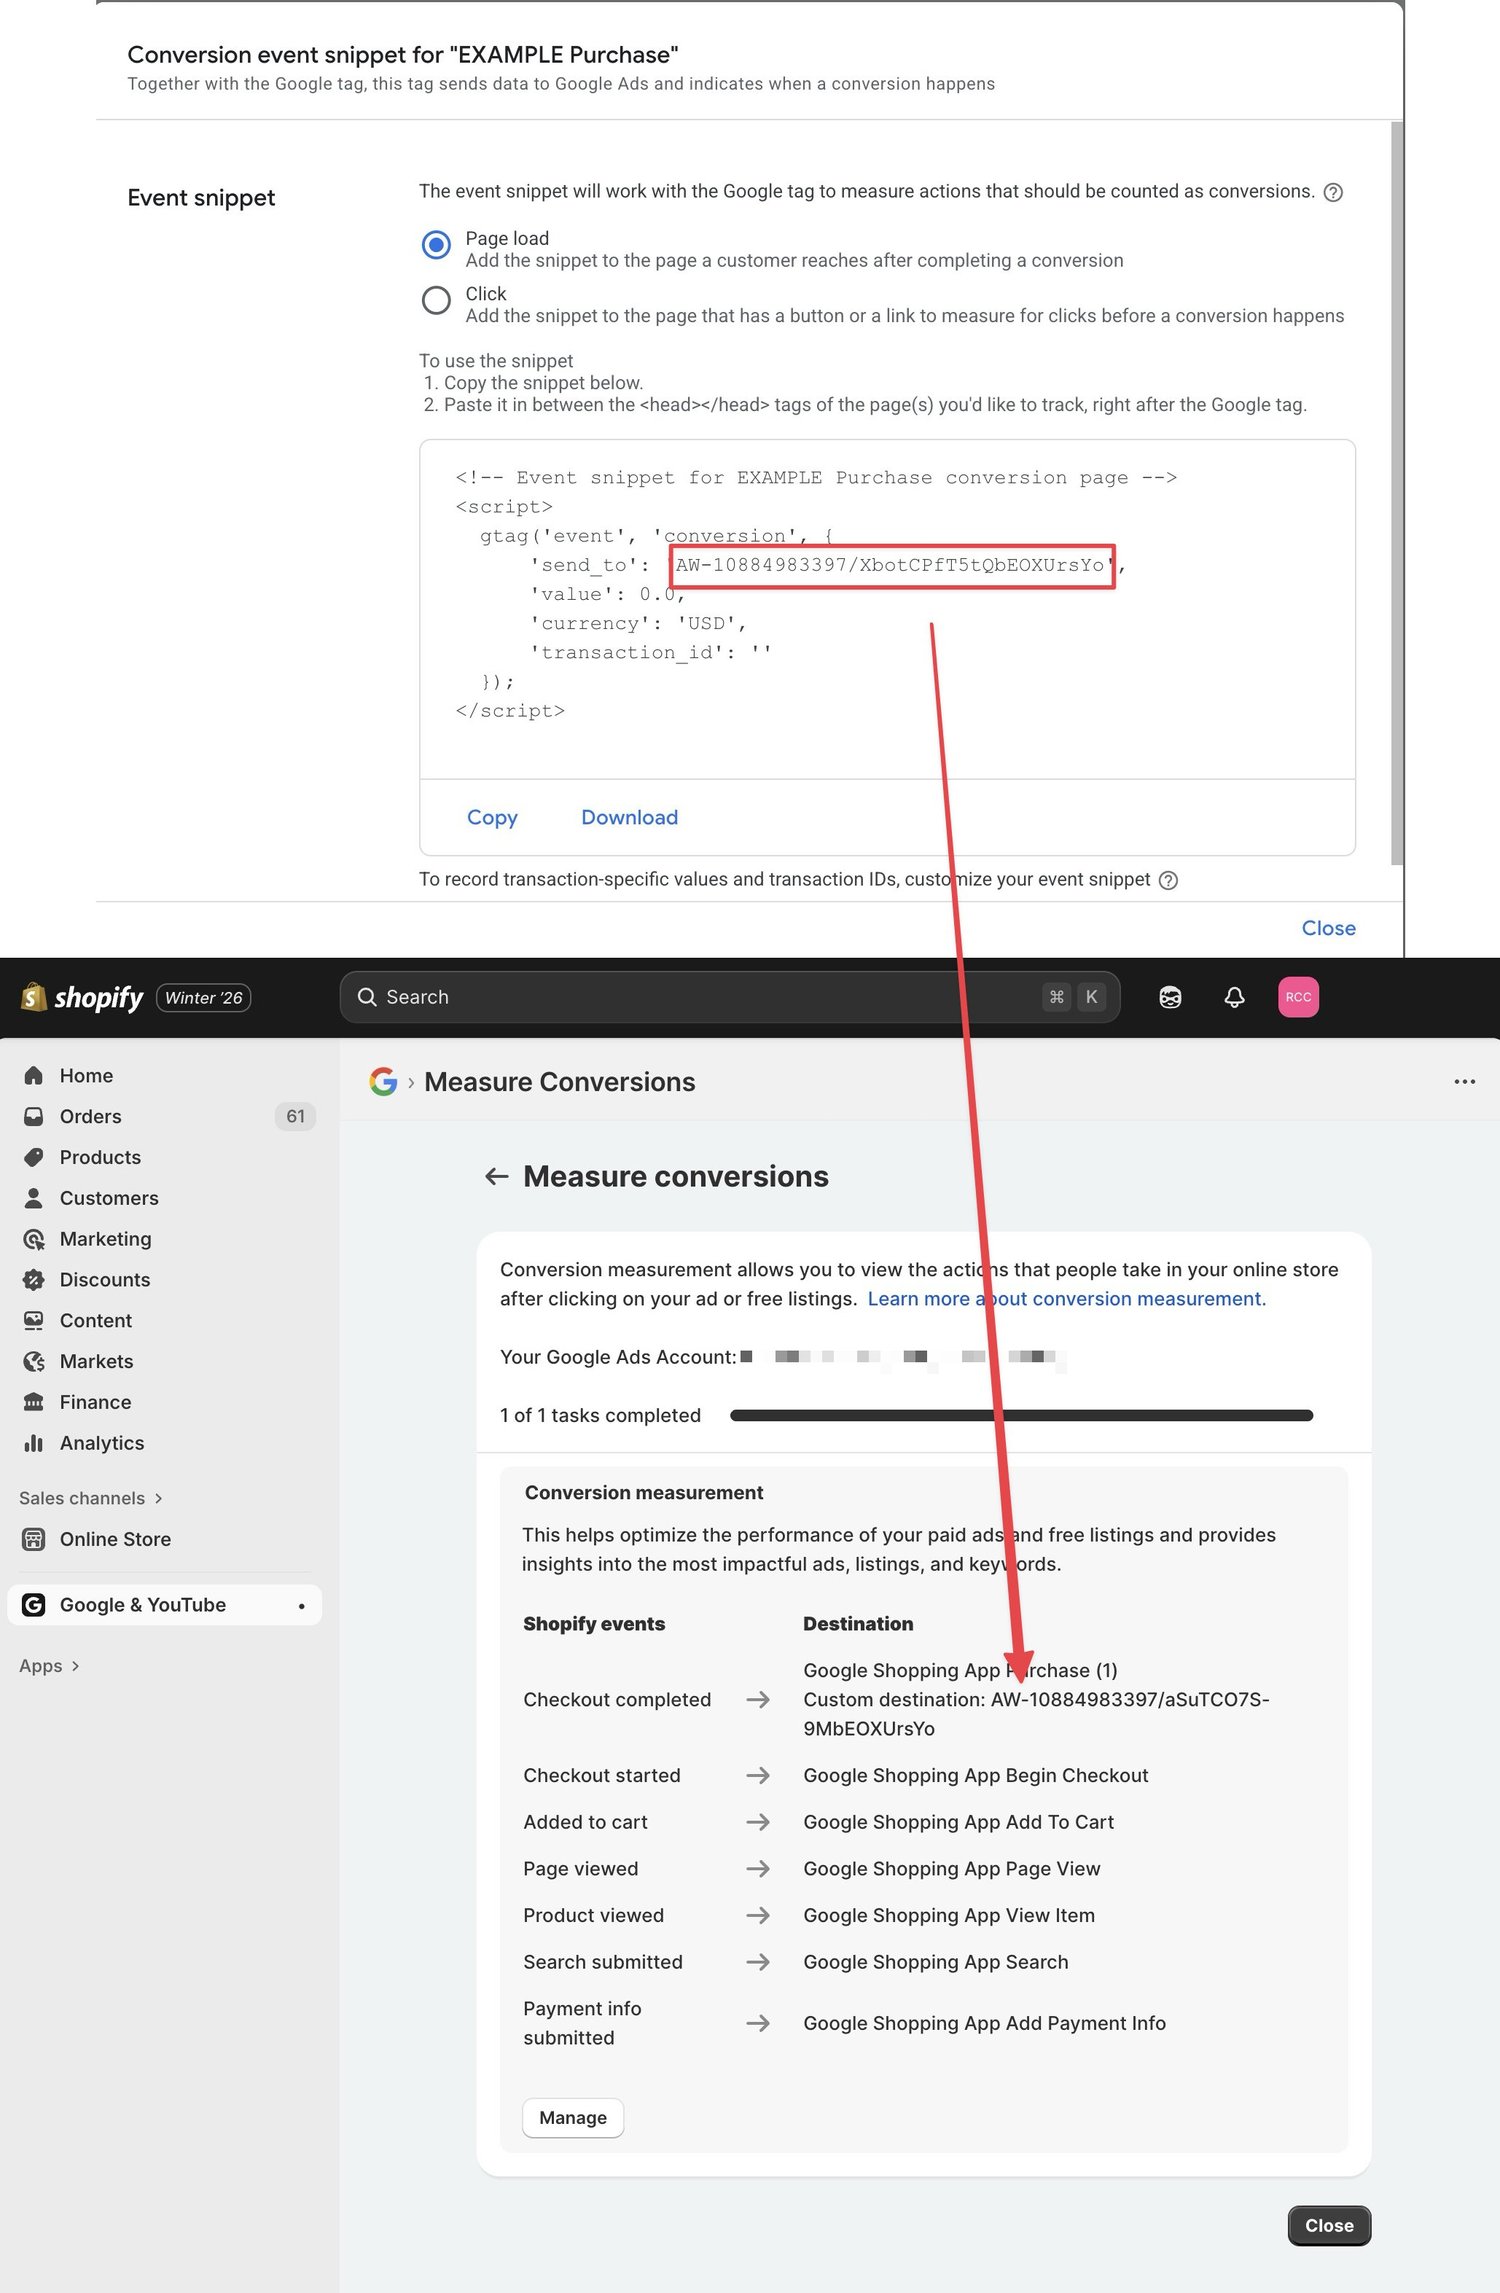
The way I proceeded when doing this migration was to create a custom conversion in Google Ads, because I wanted to make sure that I can control the conversion ID and the conversion label manually. This will be very important later on. The pre-conversions or the micro-conversions were fine with me, but I connected my newly created conversion inside the Google YouTube Shopify app.
The format can be copy-pasted from Google Ads to Shopify. Make sure to have AW- in the beginning, like this.
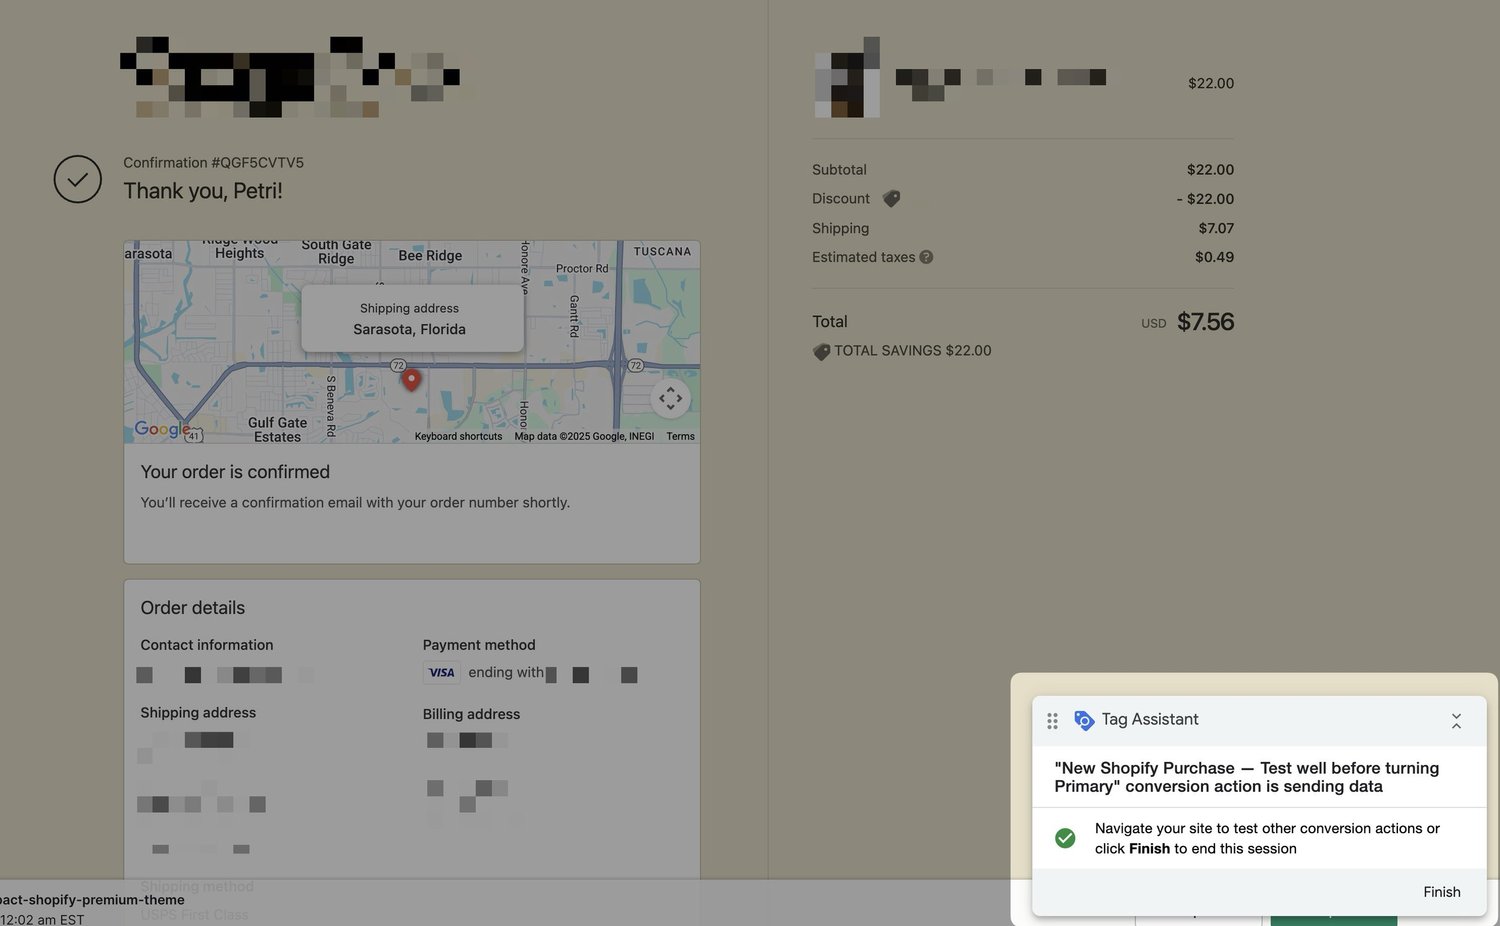
After creating the new conversion and connecting it in Shopify, I wanted to make sure that it is working properly, so I clicked troubleshoot and went through the Shopify purchase process until I saw the Google Tag Assistant verify that this conversion was working.
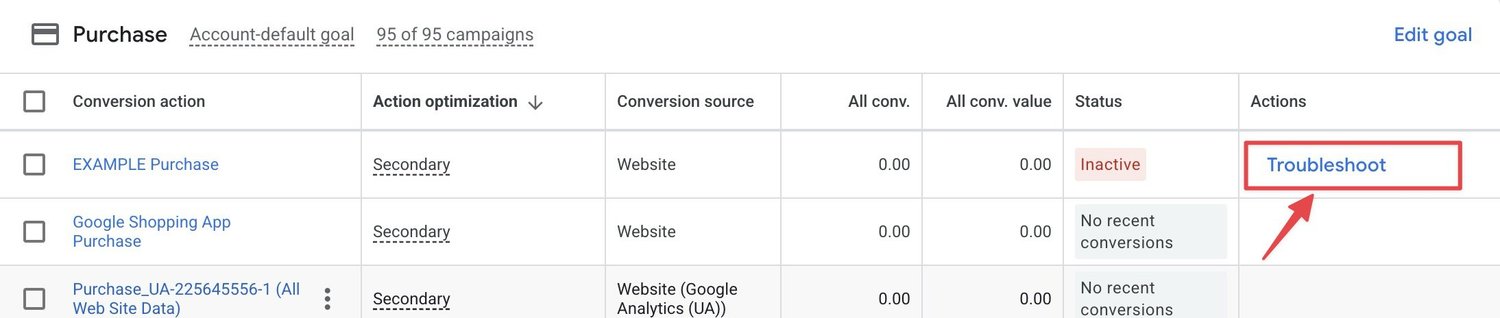
And it was.
I wanted to double-check I understood everything exactly. So I ran the old Shopify Google Ads conversion parallel alongside my new Google and YouTube Shopify app Google Ads conversion, making sure that the numbers match and everything is working. So for a moment we will do the old method and new method together, but making sure that the new method is set up as a secondary conversion so you’re not actually double counting for your ad campaigns.
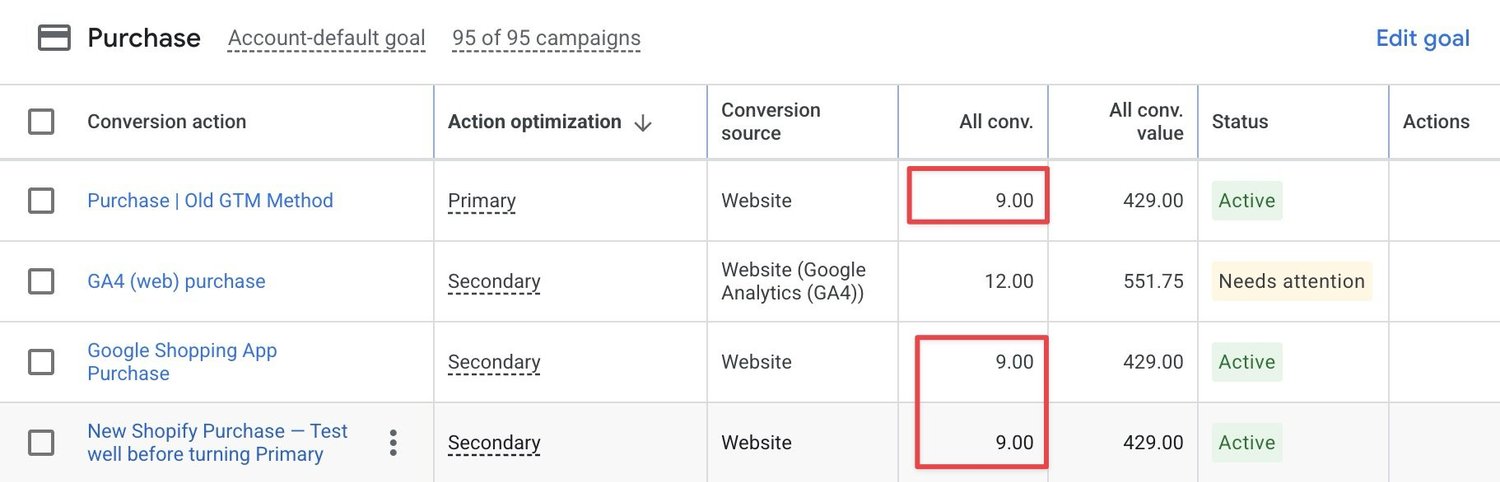
After a couple of days, I checked the data for the time period after I did my updates, and I saw that the old method and the new method were all working.
With this, I now had the confidence and the understanding to proceed.
❗Important! We always want to keep using the old conversion goal and not switch to a new goal. This is very important to keep the algorithm learning and momentum going.
So while I did create a new conversion action and was happy that it was receiving data, when I actually make the switch, I only wanted to make sure that I understand, test and verify exactly how the new Google Ads conversion tracking works.
But then grab the conversion ID and the label, my original conversion action, and copy-paste those into the Shopify app.
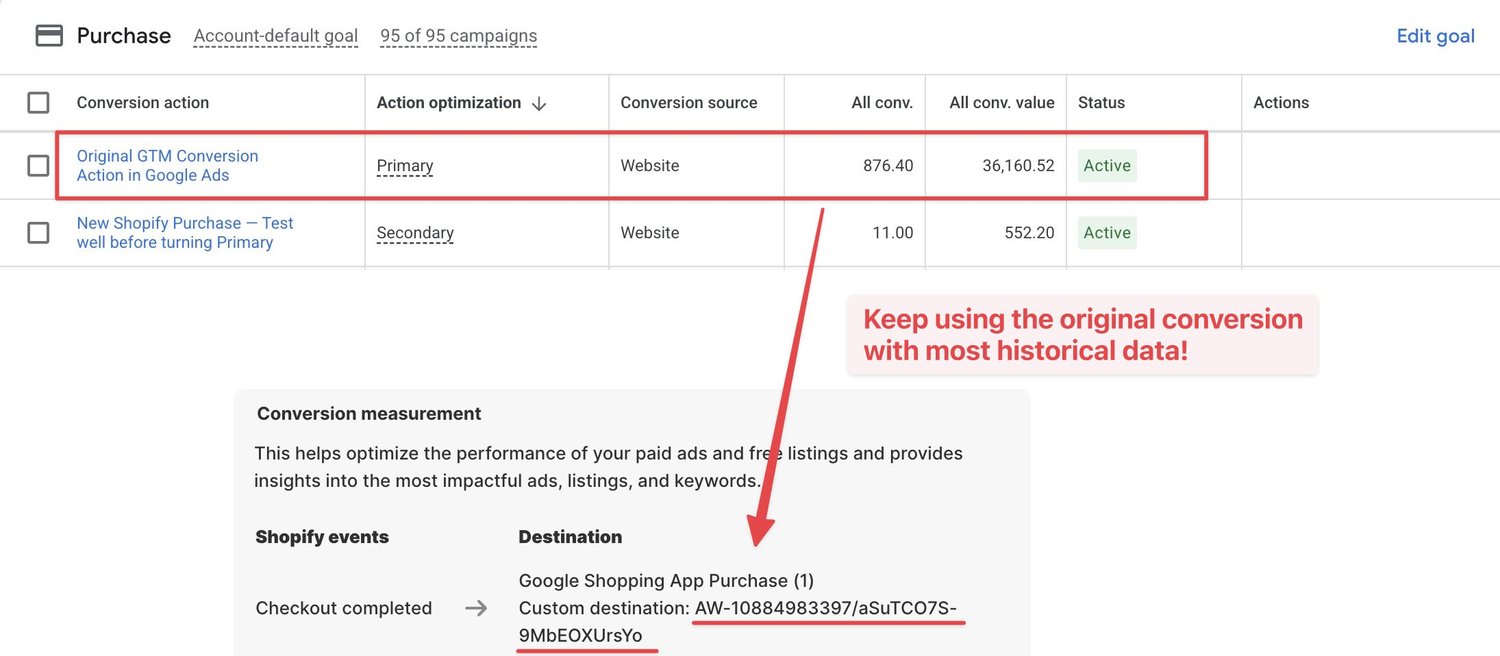
So the last steps I’m going to do is to update the conversion ID and the conversion label in the Shopify Google YouTube app using my best, oldest Google Ads conversion goal that has most historic data from the longest time.
After this, we should be ready to click upgrade here.
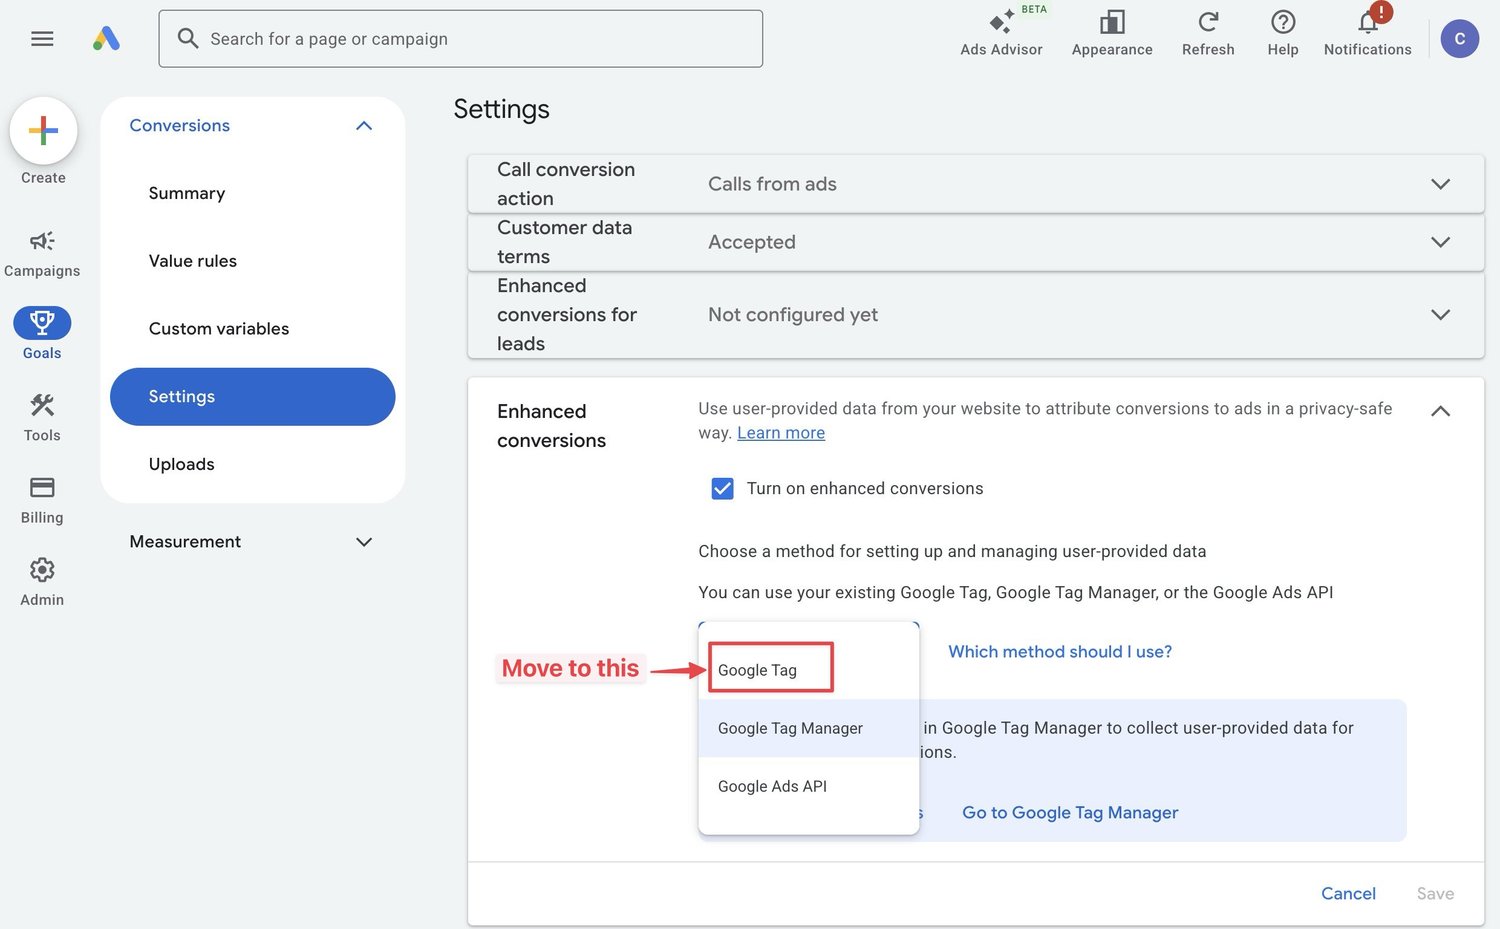
The last step is to switch our enhanced conversion tracking method. If you were previously using the Google Tag Manager method for Google Ads conversions, then we will need to edit one setting in Google Ads. We will go to our conversion settings, enhanced conversions and start using Google Tag instead of Google Tag Manager for our enhanced conversions.
Need Help With Shopify Conversions?
Conversion tracking may feel complex and overwhelming. If you need help setting up your Shopify-Google ads conversion tracking, get in touch.
I’d love to help.
Old Blog Post Content Below
Old blog post starts below. For curiosity only. The information below no longer applies.
I needed to figure out how to do Google Ads conversion tracking for a Shopify client. I was not impressed by the other tutorials as each was missing something. I wanted to figure out the absolute PERFECT Google Ads conversion tracking setup for Shopify.
Quick solution #1 · Hire me
You just sit back. I’ll track Google Ads conversions for you. Record a video demo showing it’s working before you pay. Not happy? No payment.
I’m a freelance who does conversion tracking all day every day. If you want an easy solution 100% sure to work, tested and done for you, just get in touch Contact us.
It usually takes under 1 hour, we can send a few WhatsApp messages and get the best conversion tracking setup for Shopify + Google Ads with 0 effort.
Quick solution #2 · Buy a prebuilt-setup & install with couple clicks
If you want a cheaper way, but still want to get an easy solution without doing all the complex setup, you can buy my Shopify Google Tag Manager Setup for Google Ads. You can simply import a readymade setup in a few clicks and have the best setup in a few minutes.
The hard way - DIY
If you’re more adventurous or perhaps a new store on a Shopify basic just trying out, here’s how you can DIY for Shopify Google Ads Conversions, still getting the Enhanced Conversions and a professional end result.
Best Shopify Google Ads Conversion Tracking Setup
My criteria for the absolute perfect Shopify Google Ads conversion tracking setup:
- We want our Shopify and Google Ads to use the new more accurate Enhanced Conversion Tracking.
- We want our Google Tag Manager Enhanced Conversion Tracking setup to 100% complete. We want Google Ads to know:Email
- Phone
- First Name
- Last Name
- Address
- Postal / Zip
- Country
- Region
- City
- Purchase value
- Currency code
- Transaction ID (Shopify Order Id) - to prevent duplicates
Use Google Tag Manager. It’s the industry standard professional tool. We do not want to have messy inline code all around. We want a visual, version controlled, labeled setup in a neat Google Tag Manager folder, using clearly named data layer variables
We want a Google Ads conversion setup we can test and debug visually using the new Google Tag Assistant
A lot of tutorials miss some of these parts. Most do not do the enhanced conversion tracking, or use outdated or unprofessional stuff like gtag, inline code snippets etc.
How to get the perfect Shopify Google Ads Conversion Setup?
Creating a Shopify conversion inside Google Ads
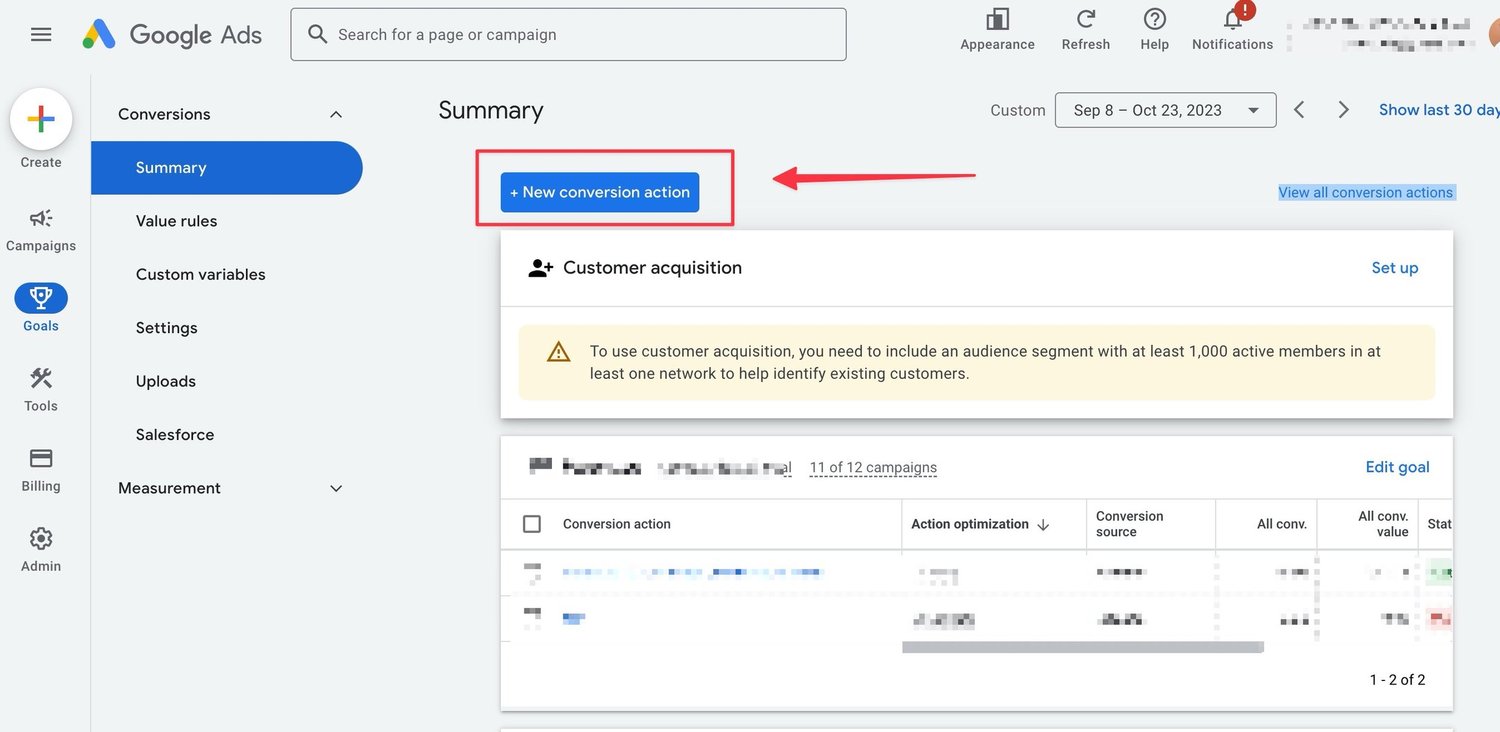
- Go to Conversions inside your Google Ads admin
- Click the blue + New conversion action button
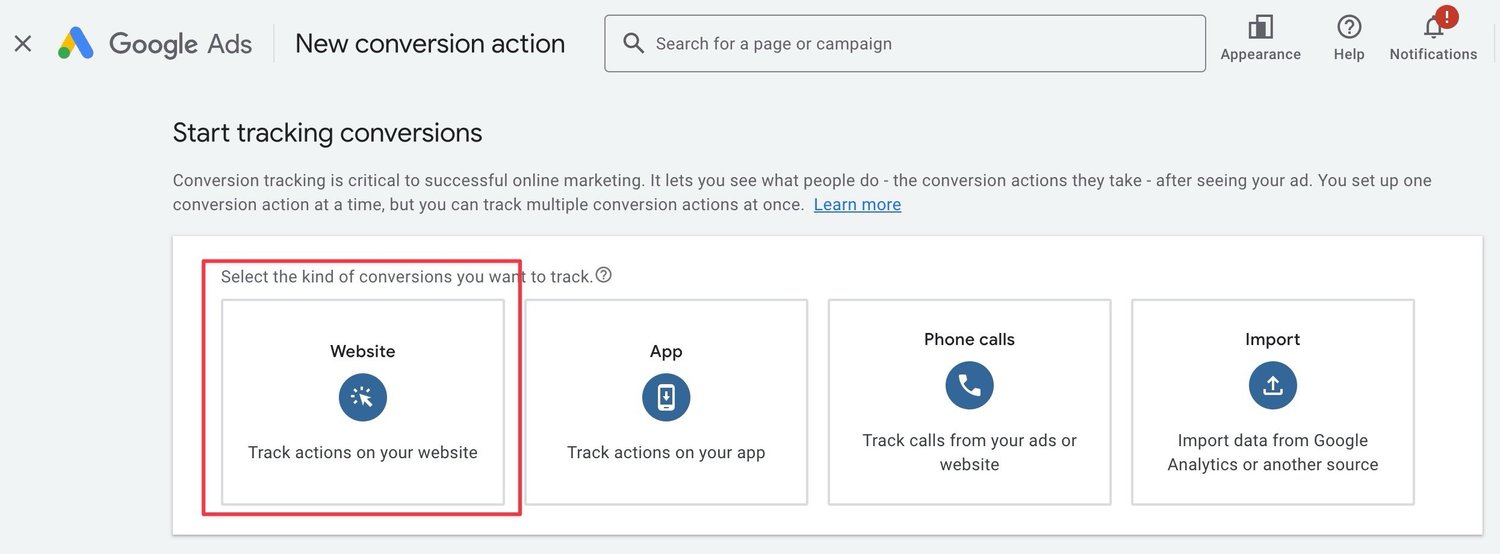
- Select Website
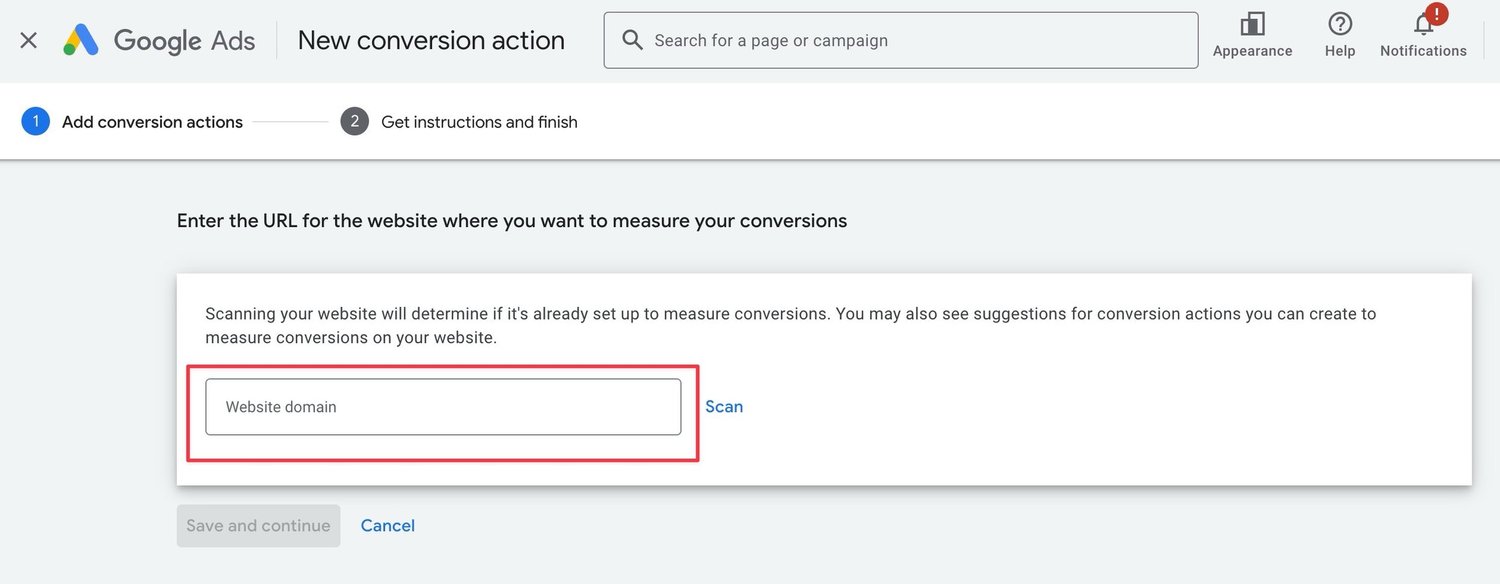
- You must scan your website. Ignore this and skip.
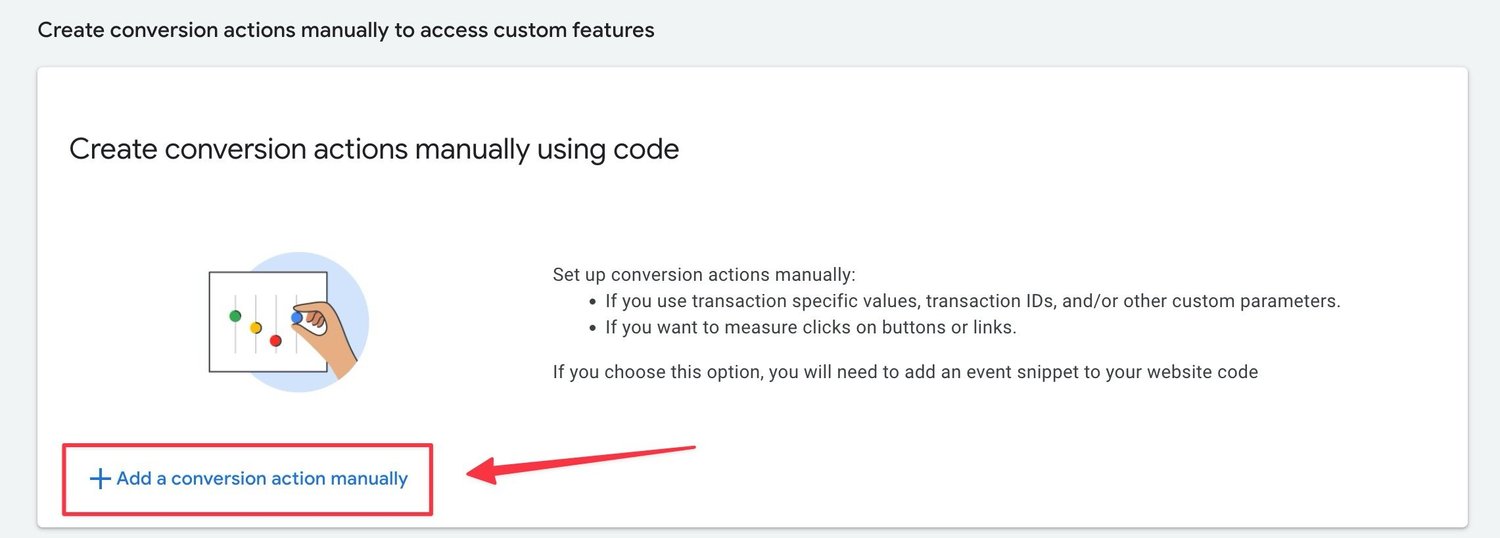
- Click + Add a conversion action manually
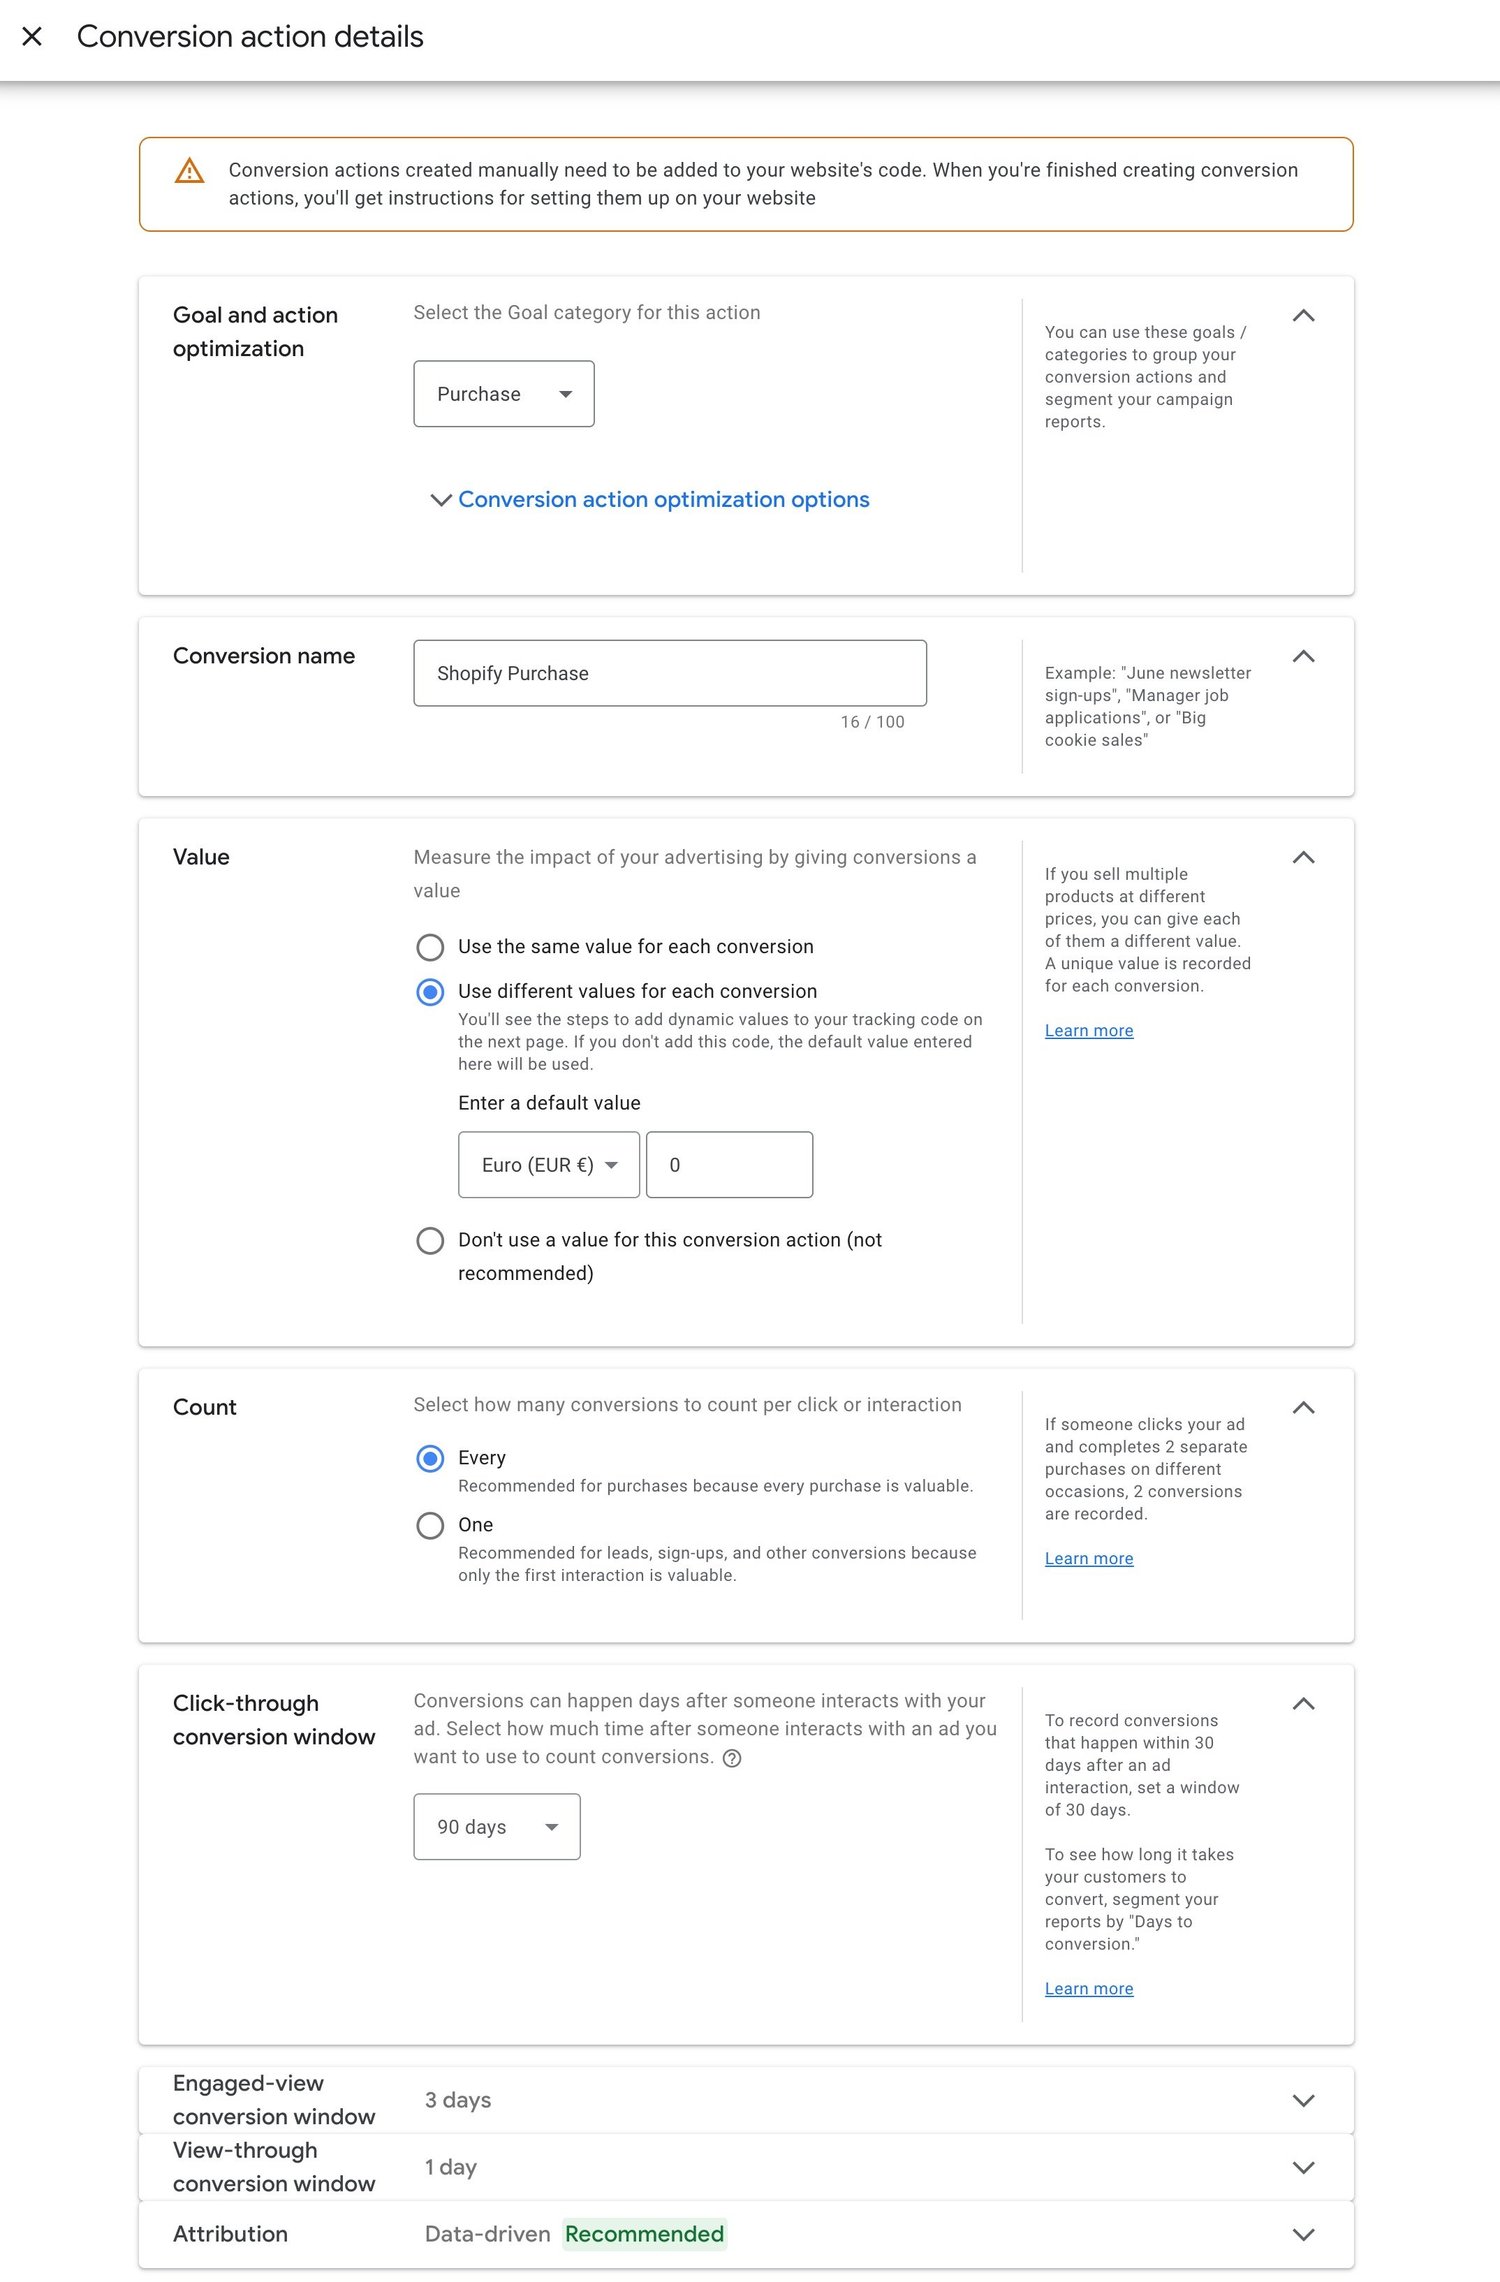
- Create your Google Ads conversion for Shopify purchases. Goal category for this action: Purchase
- Conversion name: Shopify E-Commerce Purchase - Enhanced (via GTM)
- Value: Use different values for each conversion
- Enter a default value: 0
- Count: Every (Recommended for purchases because every purchase is valuable)
- Click-through conversion window: 90 days (or whatever you prefer)
- Choose Google Ads View-through conversion window and Engaged-view conversion window for your Shopify purchase. I use default values.
- Click “Save and continue” in the bottom
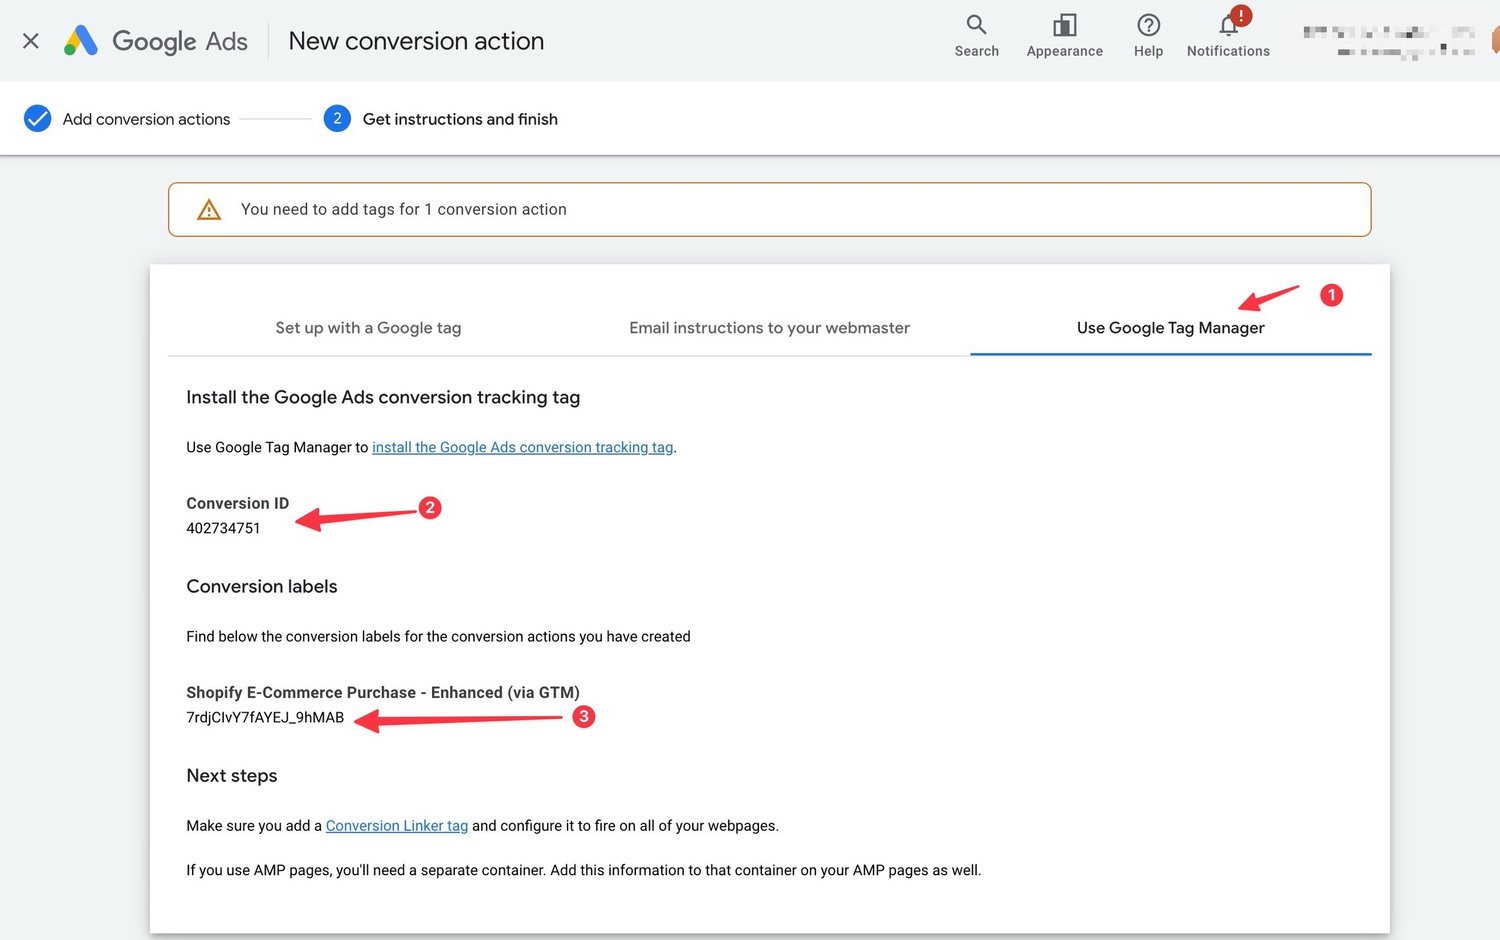
- Grab the Google Ads conversion ID and conversion label for the Shopify purchase
Enabling Enhanced Conversions in Google Ads
Inside Google Ads, go to your new Conversion Shopify E-Commerce Purchase - Enhanced (via GTM) and scroll down to Enhanced Conversions.
- Click “Turn on enhanced conversions”
- how you want to set up enhanced conversions: Google tag or Google Tag Manager
- Click Next
- Again you must check the website.
- Just make sure it’s enabled even if Google Ads says something about missing gtag or Google Tag Manager
Installing Google Tag Manager to Shopify
We’ll then continue with installing Google Tag Manager to Shopify.
- Go to tagmanager.google.com
- Create a new Google Tag Manager container
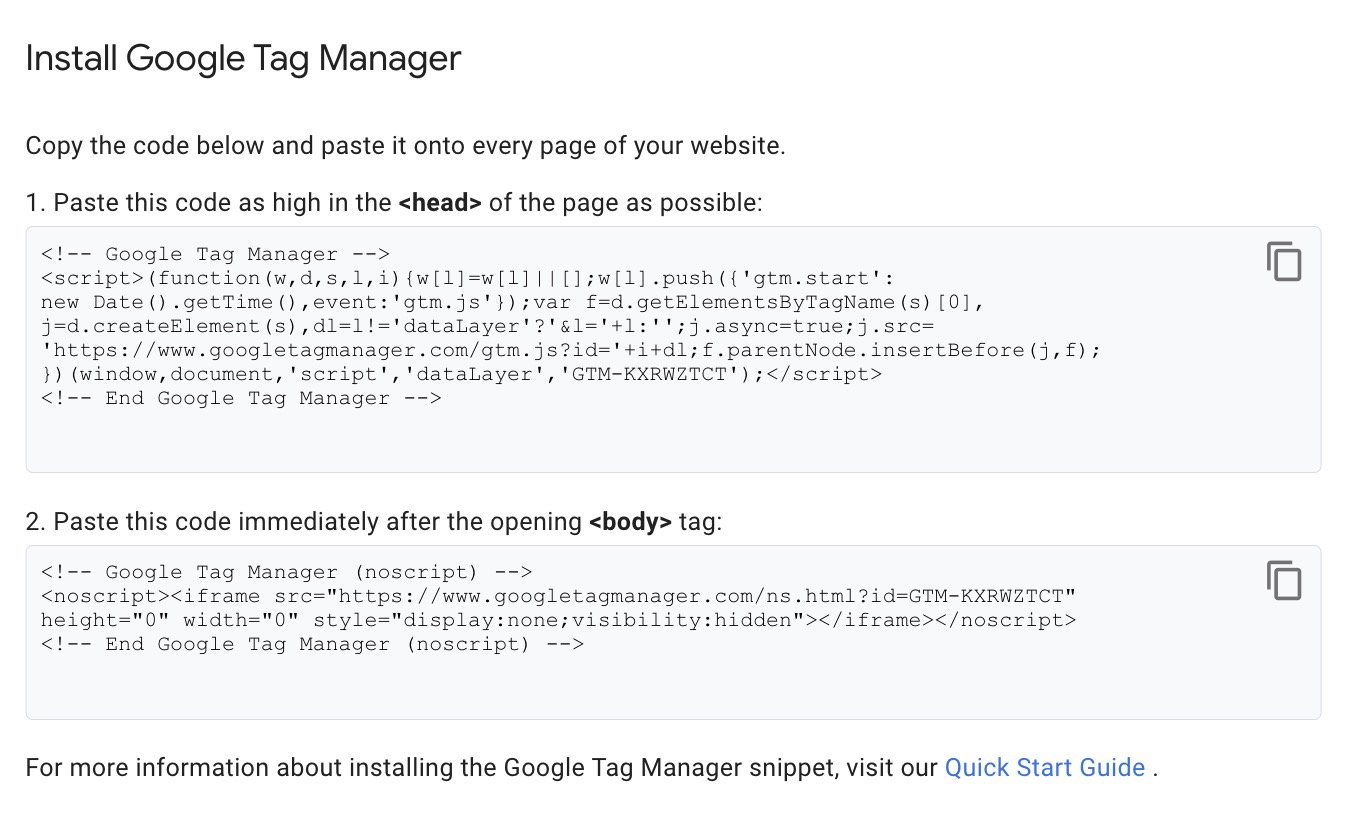
- Copy the Google Tag Manager code
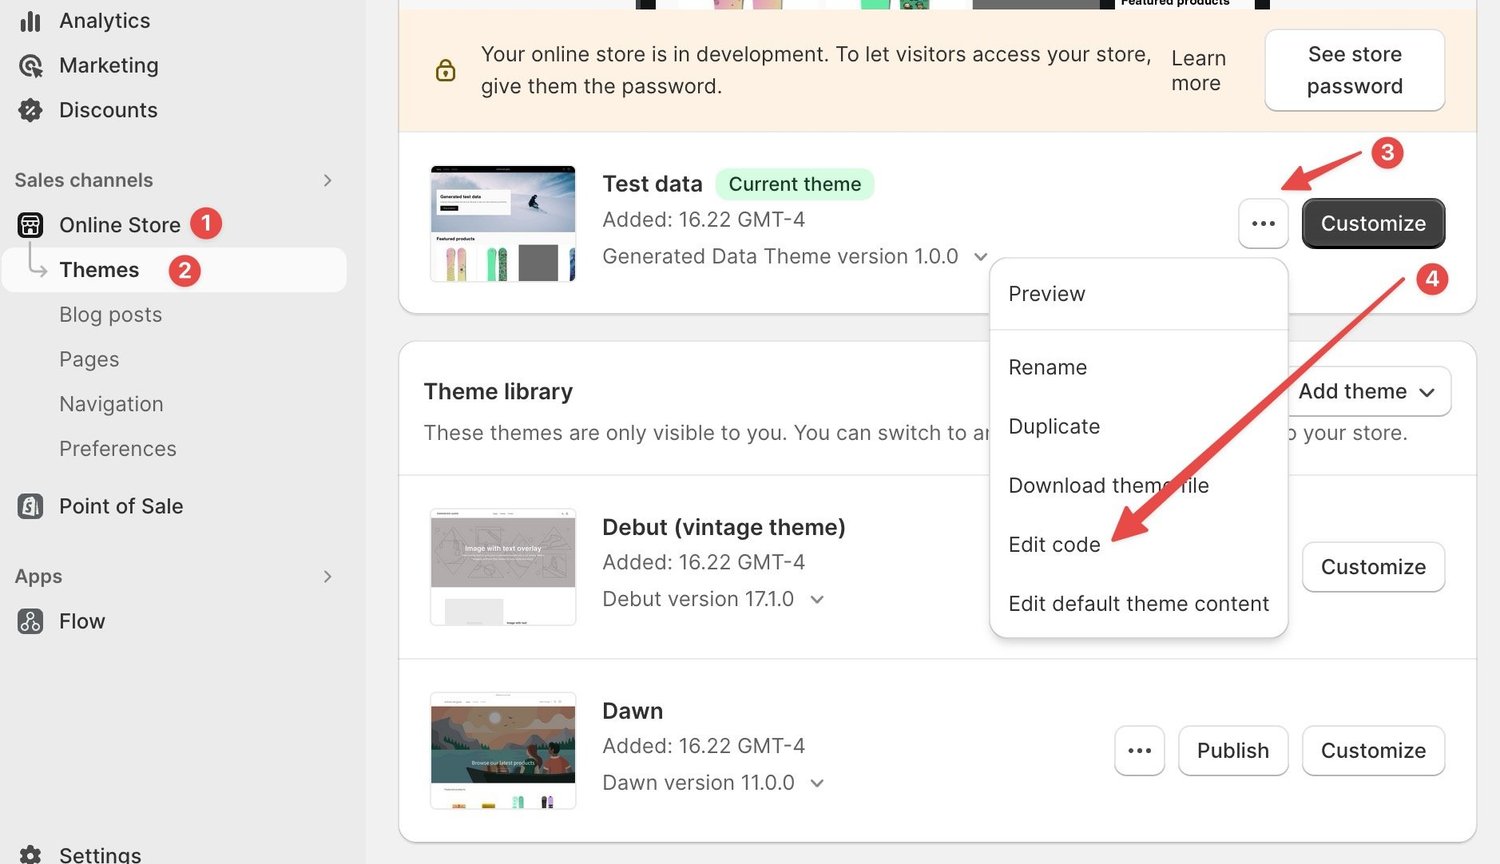
- Add it to your Shopify by going to Themes -> Your theme -> edit code
- Find the theme.liquid and paste your Google Tag Manager setup inside the
<head>tag - Publish your your Shopify theme with Google Tag Manager installed
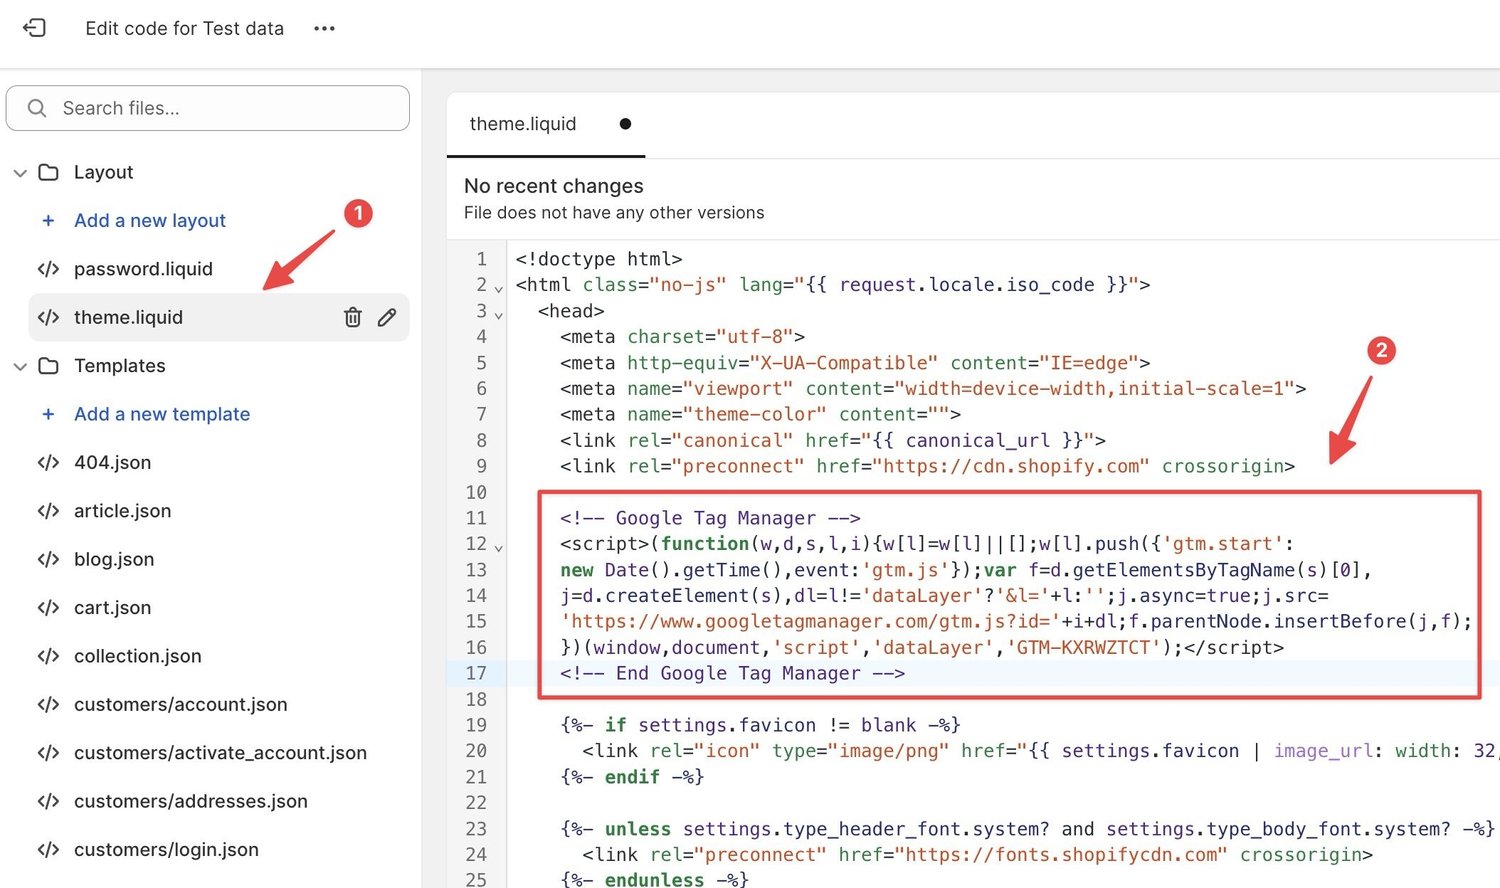
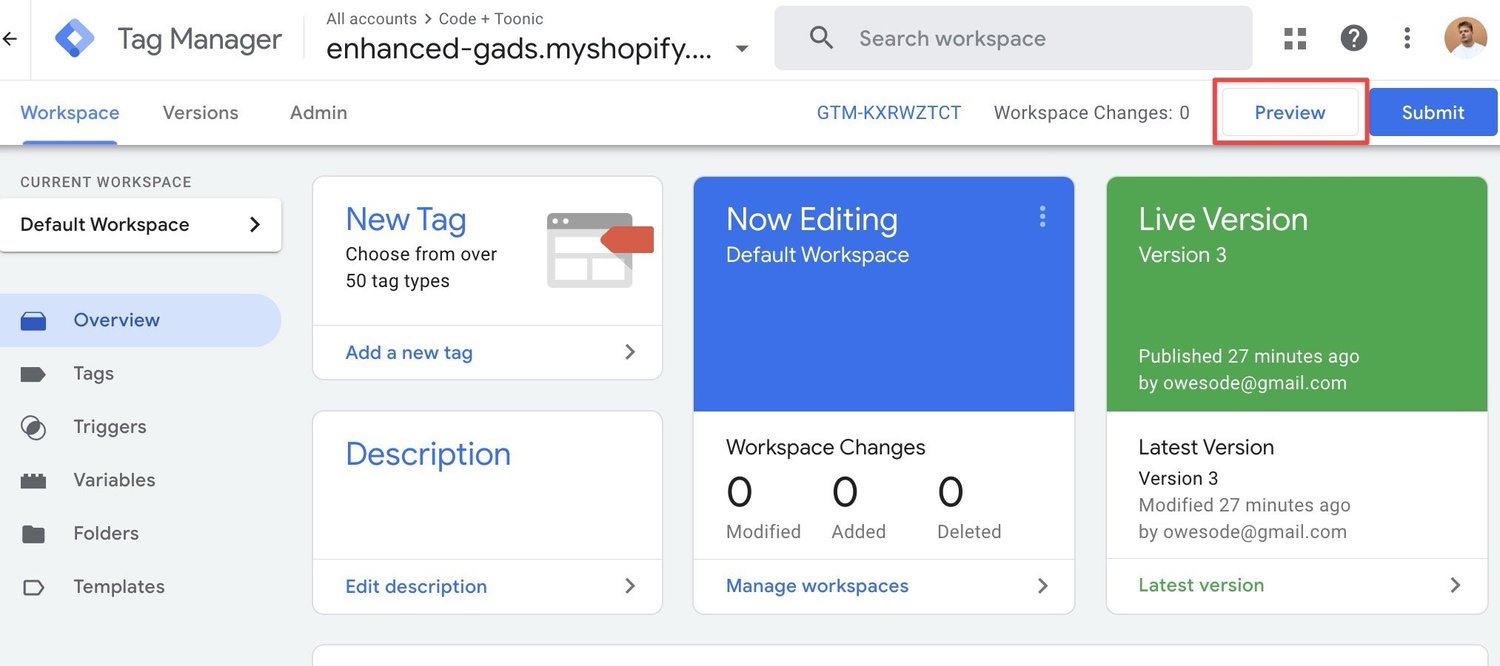
Next, I recommend going to Google Tag Manager and clicking preview to make sure Google Tag Manager is installed correctly and connects.
Next we’ll install Google Tag Manager and our data layer code to Shopify checkout Order status page
- Go to Shopify admin
- Click Settings
- Click Checkout
- Scroll to Order status page
- Find “Additional scripts” code field
- Add Google Tag Manager there ( ! Yes, we must install Google Tag Manager here as well. The one from theme.liquid is not added to the Shopify Order Status Page)
- Also add the following code below Google Tag Manager
<script>
  // Add Content Box with Order Details
/*
  Shopify.Checkout.OrderStatus.addContentBox(
    `<h2>Order Details</h2>
    <p>Order Number: {{ order_number }}</p>
    <p>Total Price: {{ total_price | money_without_currency }}</p>
    <p>Email: {{ email }}</p>
    <p>Phone: {{ phone }}</p>
    <p>Shipping Details:</p>
    <ul>
      <li>Name: {{ shipping_address.name }}</li>
      <li>Country: {{ shipping_address.country }}</li>
      <li>City: {{ shipping_address.city }}</li>
      <li>Province: {{ shipping_address.province }}</li>
      <li>First Name: {{ shipping_address.first_name }}</li>
      <li>Last Name: {{ shipping_address.last_name }}</li>
      <li>Phone: {{ shipping_address.phone }}</li>
      <li>Zip Postal: {{ shipping_address.zip }}</li>
    </ul>`
  );

*/
   // Push to dataLayer
  dataLayer.push({
    'event': 'shopifyOrderDetails',
    'email': '{{ email }}',
    'phone': '{{ shipping_address.phone }}',
    'firstName': '{{ shipping_address.first_name }}',
    'lastName': '{{ shipping_address.last_name }}',
    'street': '{{ shipping_address.address1 }}',
    'city': '{{ shipping_address.city }}',
    'region': '{{ shipping_address.province }}',
    'country': '{{ shipping_address.country }}',
    'postalCode': '{{ shipping_address.zip }}',
   // 'value': '{{ total_price | money_without_currency }}', //e.g. "1.348,95" - not ideal
    'value': '{{ total_price | divided_by: 100.0 | round: 2 }}', // e.g. "1348.95"
    'currencyCode': '{{ shop.currency }}',
    'orderId': '{{ order.id }}'
  });

</script>
Install The Conversion Linker tag to Google Tag Manager
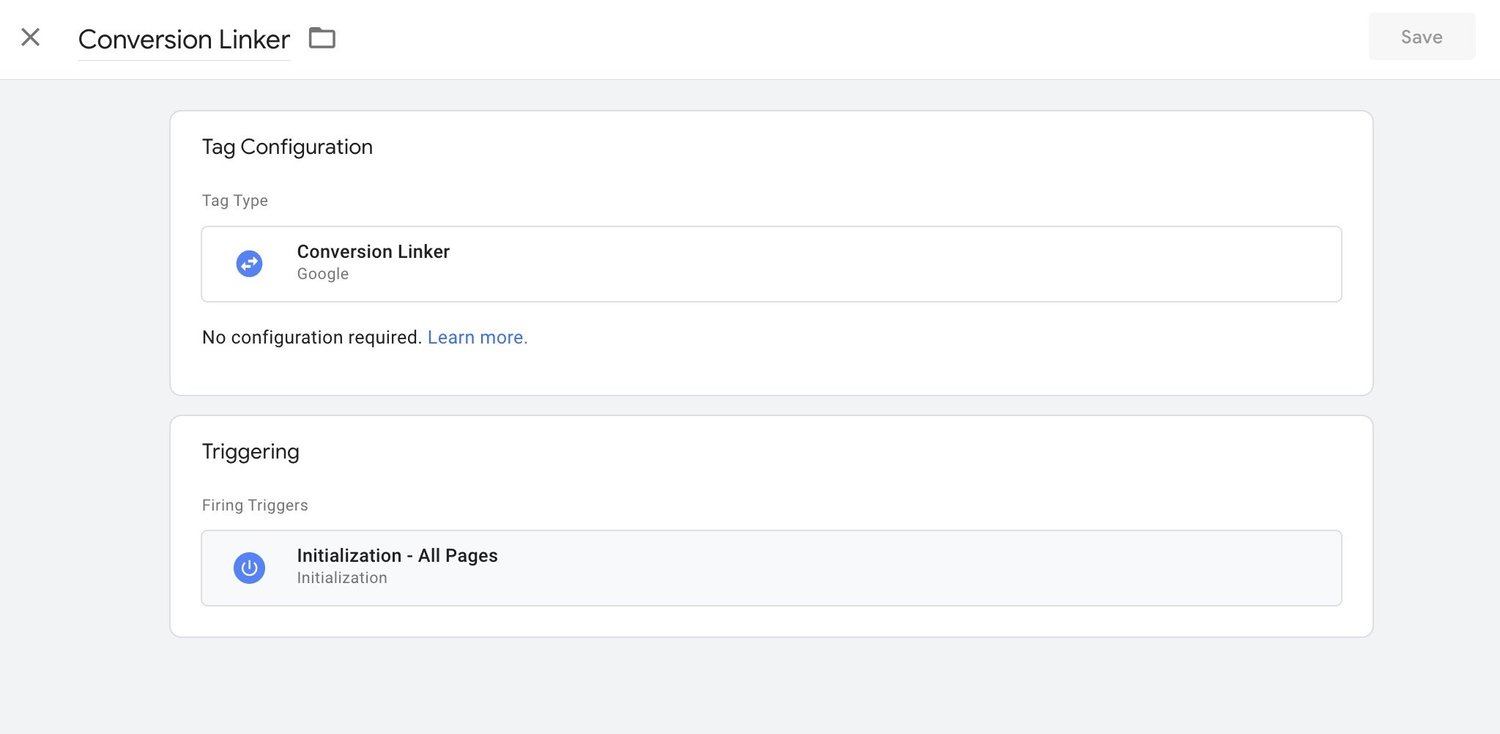
In Google Tag Manager, go to variables and create the matching data layer variables
![]()
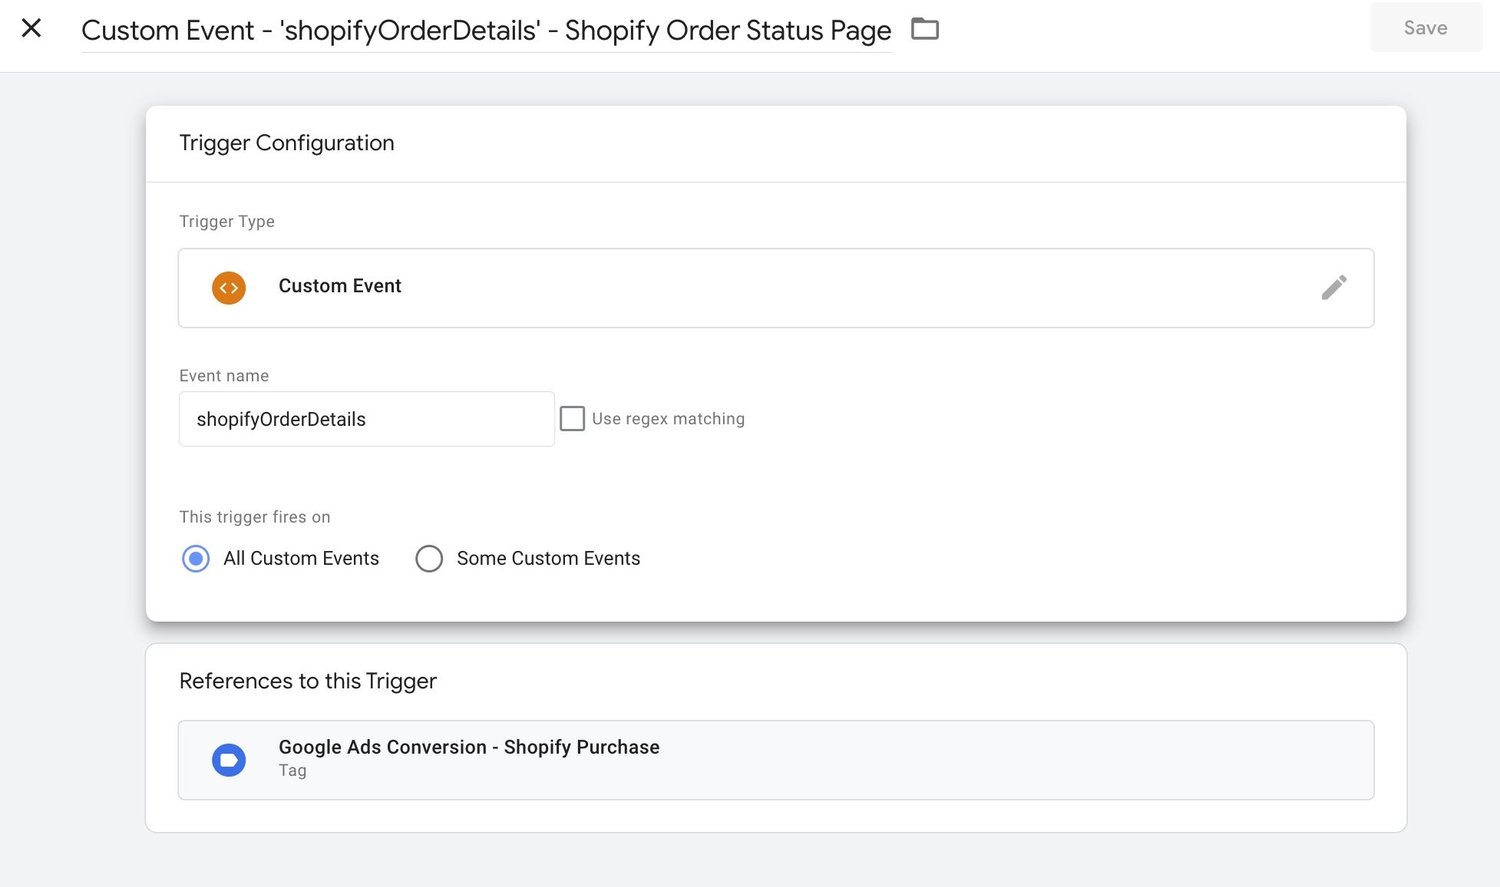
Create a custom event trigger for our Shopify Google Ad Conversion purchases.
- You can call it Custom Event - ‘shopifyOrderDetails’ - Shopify Order Status Page
- Use shopifyOrderDetails as the Event name
Create the Google Ads Conversion Tag inside Google tag Manager
![]()
For your Shopify Google Ads conversion, make sure to “check the Include user-provided data from your website” inside Google Tag Mager tag. This is what makes our Shopify Google Ads conversion “Enhanced Conversion”. We tell Google Ads all the information about the purchase and the person that did the purchase. Use the data layer variables to populate the User-Provided Data variable:
![]()
Next, click the Preview again in Google Tag Manager and make a test purchase. You can also make a test purchase and copy-paste your Order status page URL to the Google Tag Assistant preview URL.

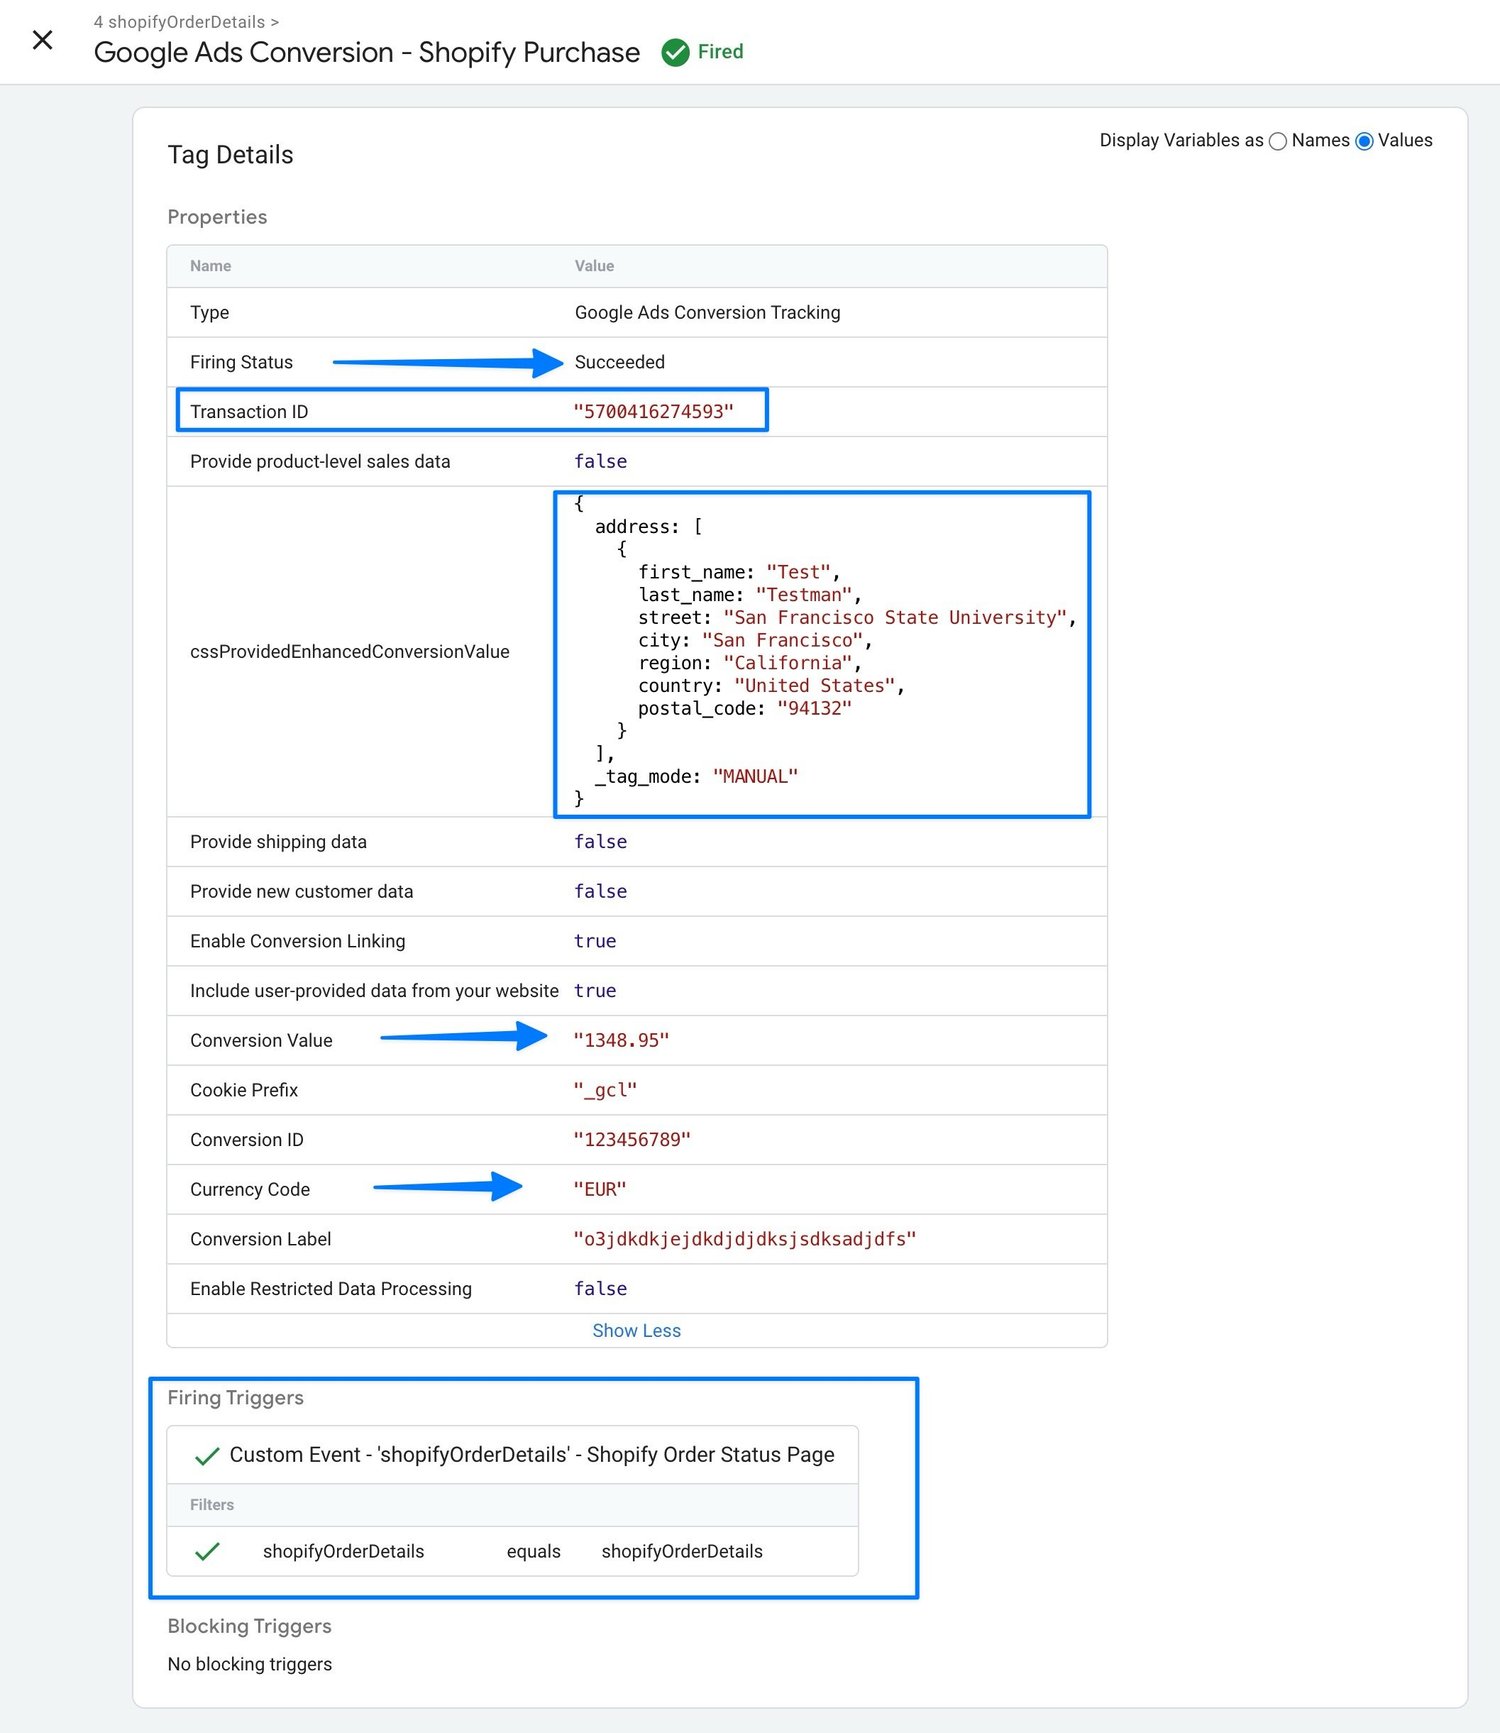
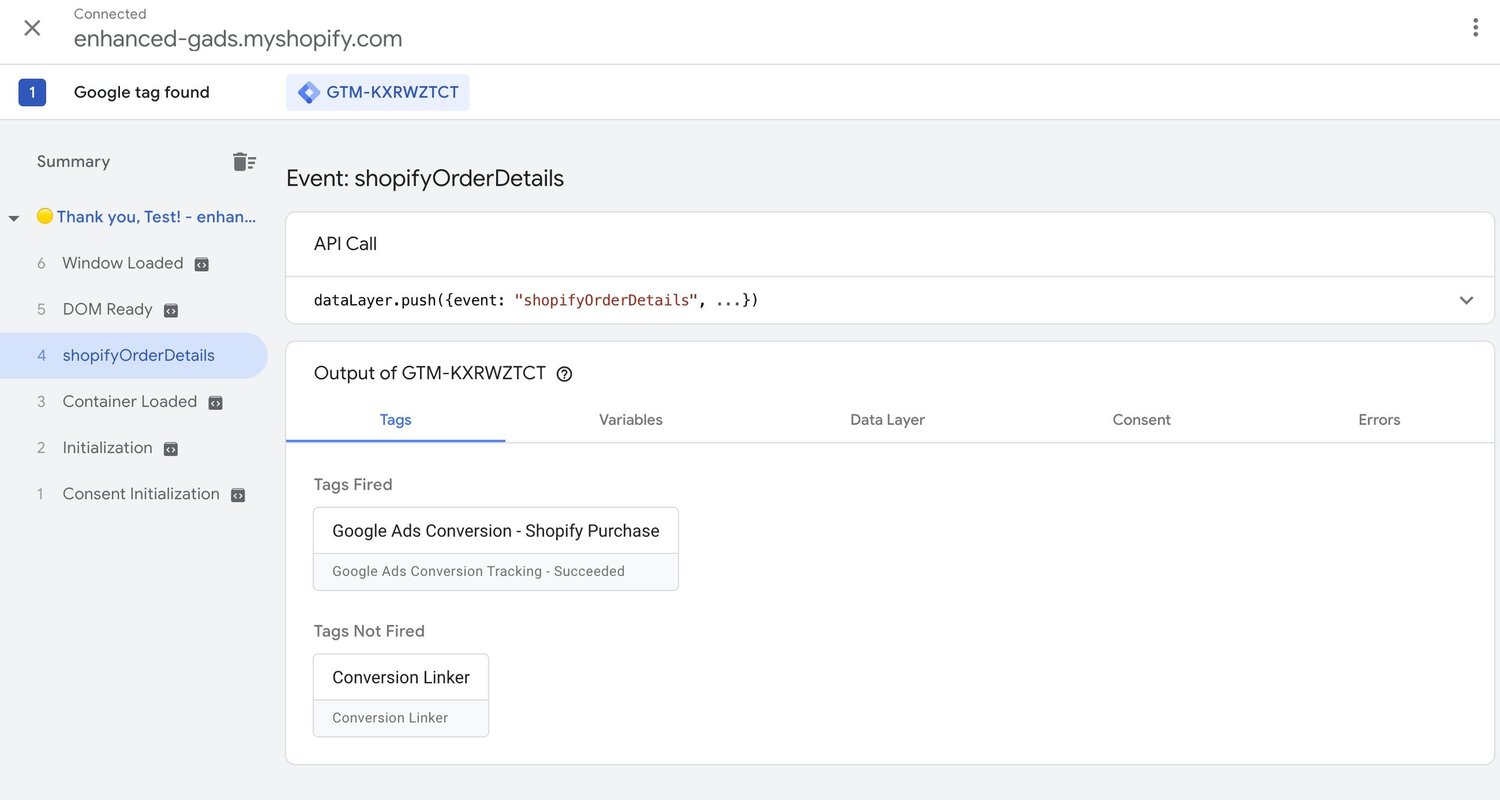
Google Tag Assistant should now show your shopifyOrderDetails custom event trigger in the left side, and show
Tags Fired:
Google Ads Conversion - Shopify Purchase Google Ads Conversion Tracking - Succeeded
And clicking on the Google Ads Conversion - Shopify Purchase -tag should now show the following information, including Google Ads Transaction ID, Enhanced Conversion object (it’s weirdly called cssProvidedEnhancedConversionValue even if we don’t use CSS to get the enhanced conversion variables). Make sure you have currency code and conversion value also correctly.